
Floor acceptance testing is the set of measurements an owner takes on a finished resin floor before signing the handover document: adhesion, thickness, cure, slip resistance, flatness and appearance. Six measurements, taken in the right places, decide whether you accept the floor or hold retention.
Most disputes about a new floor are not about whether it looks wrong. They are about whether it meets the specification, and that question has an answer only if someone measured before the contractor left site. This article sets out what to measure, which instrument and standard applies, how the pass criterion should match the tender, who should take the readings, what to do with a failure, and when the warranty starts.
Written for plant engineers, project managers and owners’ representatives with one chance to test a floor before the leverage disappears.
1. The six measurements to take before you sign
Floor acceptance testing is deliberately narrow: six measurements, each with an instrument, a standard and a sampling rule. Together they cover the failure modes that warranty claims are actually about — debonding, thin spots, under-cure, slip and ponding.
Table 1: The six acceptance measurements, with the instrument, standard, sampling rule and pass criterion for each.
| Test | Instrument | Estándar | Sampling | Pass criterion |
|---|---|---|---|---|
| Adhesión | Pull-off dolly and hydraulic puller | ASTM D4541 | 1 per 500 m², minimum 3 | 1.5 MPa typical minimum; failure in the concrete is the better result |
| Espesor | Ultrasonic dry film gauge | ASTM D6132, 80/80 rule | Grid of 5 readings per 100 m² | 80/80 rule on the specified build |
| Cure and hardness | Shore D durometer | ASTM D2240 | At 24 hours and 7 days | Specified Shore D at 7 days; 24-hour reading recorded |
| Resistencia al deslizamiento | Pendulum, or laboratory ramp result | ASTM E303 screening; DIN 51130 classification | Wet zone, 3 locations | At or above the approved mock-up, tested wet |
| Flatness and fall | 3 m straightedge and digital level | Project specification | Every 50 m² and each drain | 3 mm maximum gap; fall 1:80 to 1:100; no ponding |
| Appearance and detailing | Visual, tap test, radius gauge | Project specification | 100% of coving and junctions | Defect list closed; coving and collars sound to tap |
Scope of floor acceptance testing: the six tests in Table 1 decide the outcome. An abrasion test floor sample, a chemical spot test or a color match panel is supplementary evidence. Record it in the file and quote it when a system is disputed; it stays out of the accept or reject decision.
The order matters. Adhesion and thickness are destructive or semi-destructive, so take them before the final clean. Slip and flatness should be measured on the finished, sealed surface. Appearance is last, because walking the floor for defects disturbs nothing.
Acceptance is the only moment when the owner has leverage. After handover a thin patch becomes a warranty discussion, and a pendulum reading can no longer be compared with the mock-up, because the mock-up has been walked on and cleaned. Write the pass criteria into the tender before the pour: a test with no agreed criterion measures nothing, and the default becomes whatever the contractor achieved. Book the cure testing and the adhesion test before the final clean, and put both dates in the schedule.
2. Adhesion: the pull-off test and the number that counts
The pull off test is the only direct measurement of whether the floor is attached to the slab. A 50 mm dolly is bonded to the surface, cut around to the substrate, and pulled until something fails. Both the load and the layer that failed are recorded.
What counts is the failure load read together with the failure location. A typical specification minimum is 1.5 MPa, about 217 psi on a 50 mm dolly. A result at or above 1.5 MPa with failure in the concrete passes: the bond outlasted the slab. A result at or above the minimum with failure at the bond line passes with a note, because it points at surface preparation. A result below the minimum fails at any failure mode.
Where the dollies go is as important as the number:
- One test per 500 m², and never fewer than three, with at least one per system and one per area.
- Always at a drain collar, a plinth and a perimeter, because those are the details that lift first.
- One test on any area that was patched, primed twice, or poured in cold conditions.
Record the location on a drawing, not in a notebook. Two years later, the drawing is the only way to know whether the debonded patch is the one you tested or the one you did not. Floor acceptance testing that skips the perimeter is testing the easy part of the floor.

Figure 1: Where the pull off test dollies go. The details that lift first get their own dolly, which is why the count never drops below three.
3. Thickness: dry film and the 80/80 rule
Thickness is the part of floor acceptance testing most often argued and least often measured. Dry film thickness (DFT) is read with an ultrasonic gauge, and a DFT measurement takes seconds per reading and turns an opinion into a number.
The 80/80 rule is the usual acceptance criterion: at least 80% of readings at or above the specified thickness, and no single reading below 80% of it. On a 3 mm specification, that means no reading below 2.4 mm. Anything lower is a thin spot, and thin spots are where abrasion and chemical attack start.
Take the readings on a grid, record them on a plan, and keep the gauge calibration certificate with the report. Five readings per 100 m² is a reasonable density for a food plant floor; add readings at every drain, threshold and patch.
Where a DFT measurement falls below the limit, the remedy is usually an additional coat over the thin area rather than removal. Ask for the repair to be re-measured on the same grid points, because a repair that is not re-tested is an assumption. Settle the repair and the re-test before handover, not after.
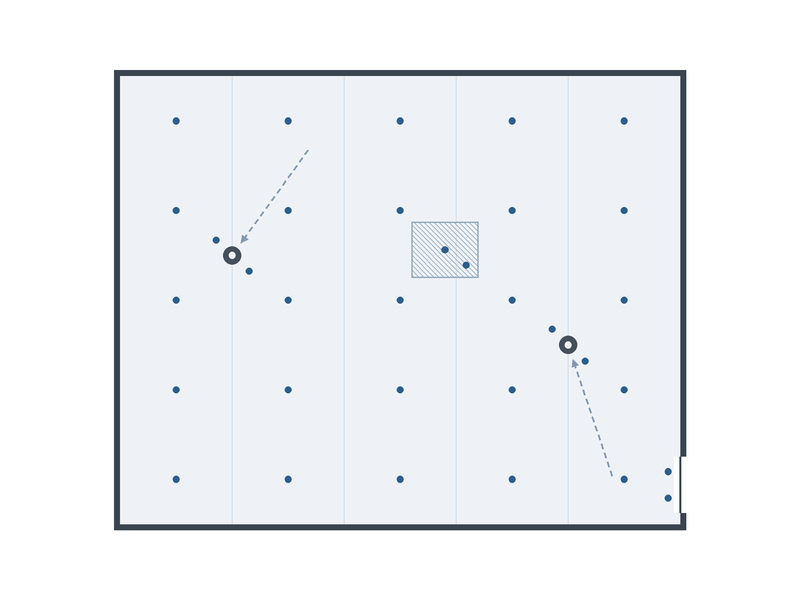
Figure 2: The DFT measurement grid is the baseline. Drains, thresholds and patches are added because a thin spot at a detail is where a floor fails first.
4. Cure and hardness: why the calendar is not evidence
A floor that has been down for seven days is not necessarily cured, and a floor that is hard on the surface is not necessarily hard at the bond line. Cure testing replaces the calendar with a reading.
Shore D hardness to ASTM D2240 at 24 hours and at 7 days gives two points on the curve. The absolute number matters less than the trend. Readings that stay the same at 24 hours and at 7 days usually mean the floor is fully cured. One that is still climbing is still hardening, and chemical washing can start once the curve flattens.
Cure testing is not a formality. A floor that is under-cured at handover passes a visual inspection and fails in service, because the first chemical wash removes the surface before the film has cross-linked. Two cure testing points, at 24 hours and 7 days, cost an hour on site. On a fast-cure system cure testing carries more weight at 24 hours, because the line is already running product again.
Solvent rub testing, where the specification calls for it, checks the same thing chemically rather than mechanically. It is quick, and it catches the case where the surface is hard but the film is under-cured underneath.
Three checks make the reading valid:
- Take it on a smooth witness sample poured at the same time; a textured surface sits outside the method.
- Record slab and air temperature with every reading, because a low 24-hour value in a cold week is a temperature effect before it is a defect.
- Schedule the pull off test at seven days, so the number describes the bond rather than the cure.
5. Slip resistance on site
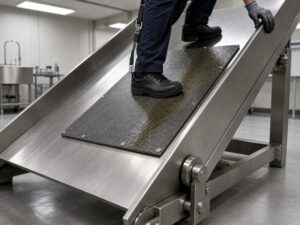
Slip is the one property where the site reading and the certificate measure different things. DIN 51130 is a ramp classification run on a prepared sample in a laboratory, so the class is earned there and quoted from the certificate.
A pendulum reading to ASTM E303 can only screen. The same reading, taken wet in the same three locations, gives a comparable number across the floor and against the approved mock-up. Record it, and treat a reading well below the mock-up as a finding to settle before signature.
The slip resistance test method has one limit on site: the reading depends on the rubber slider, the water film and the operator. Keep that limit in view and the reading still does its job in floor acceptance testing: compare only readings taken the same way, on the same day, with the same slider grade.
Two rules keep a site slip resistance test method within its limits:
- Quote the R class from the laboratory certificate only, and keep the pendulum number as a site screening value.
- Test wet, with the contaminant that is actually present: oil in a fryer bay, fat and blood in a meat room, dilute caustic after clean-in-place (CIP). A dry reading describes a floor nobody works on.
If the site slip resistance test method returns a value materially below the mock-up, suspect the seal coat first. A heavy topcoat buries the aggregate and drops the floor a class while the certificate still shows the higher one.
6. Flatness, fall and drainage
Surface flatness and fall are measured with a 3 m straightedge and a digital level, and both should be recorded before the floor is handed over. A floor that ponds is a floor that will fail at the pond, and ponding is very hard to argue about after the contractor has left.
The usual acceptance figures:
- No gap under a 3 m straightedge greater than 3 mm.
- Falls of 1:80 to 1:100, about 1.0–1.25%, across the production floor, and up to 2% at local wet zones and equipment surrounds.
- No standing water anywhere on the floor 30 minutes after a water test.
Surface flatness is measured twice for a reason: once with the straightedge to find high and low spots, and once with water to find where it stands. A floor can pass a surface flatness check and still pond, because a local dip of 2 mm holds water across a large area.
Run the water test with the drains clear and the floor clean. Photograph the result, with the drain in frame, and record the time. That photograph is the single most useful piece of evidence in a ponding dispute.
7. Appearance, coving and the defect list
Appearance is subjective until it is written down. Walk the floor with a defect list and a camera, and record every item with a location tag.
The list that matters:
- Pinholes and craters, especially in the body coat under a topcoat.
- Lap marks and roller edges, which show as bands under grazing light.
- Color variation between batches, which is normal but should be agreed in advance.
- Loose aggregate, which sheds into the product stream and indicates a weak seal.
- Sealant condition where the resin meets a wall, a plinth or a drain collar.
- Coving continuity, radius and adhesion at the floor-to-wall junction.
- Drain collars, plinth edges and thresholds, where the membrane is cut and re-formed.
An abrasion test floor panel, when the specification asks for one, belongs in the same pack as the site readings. Keep the two kinds of evidence apart: a panel describes the system, and a surface flatness reading describes this floor and the workmanship on it. Mixing them turns a clear failure into a negotiation.
Tap test the coving and the drain collars. A hollow sound means the resin has debonded from the substrate, and it will not improve with age.
Table 2: Defect list and responsibility at floor acceptance testing.
| Defect | Measured by | Responsibility |
|---|---|---|
| Low adhesion at a collar | Pull off test | Contractor, repair and re-test |
| Thin spot in the field | DFT measurement | Contractor, additional coat |
| Soft film at 7 days | Shore D hardness | Contractor, investigate mix and temperature |
| Ponding at a drain | Water test and level | Contractor, re-form fall |
| Loose aggregate | Visual and tape pull | Contractor, reseal the area |
| Hollow coving | Tap test | Contractor, cut out and rebuild |
8. Records, retention and the warranty start date
The acceptance pack is what you keep when the contractor has gone. It should contain the test report with grid references, instrument calibration certificates, batch numbers, product data sheets, photographs and a signed acceptance sheet.
Have the readings taken by someone outside the installation crew: an owner’s representative, an independent inspector or the coatings manufacturer’s technical service. The installer attends and witnesses, and the sheet carries both signatures. A reading taken by the party being tested is a claim, not evidence.
Table 3: The acceptance pack, and why each document matters two years later.
| Document | Contains | Why it matters |
|---|---|---|
| Test report | Results, locations, pass, pass with a note or fail against the tender | The only evidence of condition at handover |
| Calibration certificates | Gauge and puller calibration dates | Makes the numbers defensible |
| Batch records | Material batch numbers by area | Links a failure to a production lot |
| Wet-film records | Wet-film readings for each coat, taken while it is still wet | Fixes each coat before the next one covers it; the dry-film check confirms the finished build |
| Photographs | Defects, water test, coving detail | Settles disputes about what was agreed |
| Signed acceptance | Date, signatories, retention terms | Fixes the warranty start date |
Money is the last lever. Hold 5–10% of the contract value as retention until the defect list is closed and the pack is complete; releasing it early gives away the only pressure you have.
The warranty start date should be the acceptance date, not the date of the last trowel. A warranty written from application hands several weeks of cover to nobody, and in a slow handover it can be months.
The warranty start date is the last line of the pack for a reason. Floor acceptance testing closes the job; the date on the acceptance sheet starts the clock, and every week between application and signature is a week the owner never had.
Frequently asked questions
What is floor acceptance testing?
It is the measurement set that decides whether you accept a finished floor: adhesion by pull off test, thickness by gauge, cure by Shore D hardness, slip, flatness and fall, and a defect list. What separates it from a snag list is that every item carries a standard, a sampling rule and a pass criterion agreed in the tender before the pour.
What adhesion value should a resin floor reach?
Most specifications name 1.5 MPa, about 217 psi, measured to ASTM D4541. The number is only usable with four things beside it: dolly diameter, failure location, puller calibration date, and the point marked on the plan. A load with no location cannot be re-checked in two years.
How do you use DFT measurement to decide whether a floor passes?
By the 80/80 rule: 80% of readings must reach the specified thickness, and none may fall below 80% of it. On a 3 mm build that means nothing thinner than 2.4 mm. A reading below that is a thin spot, and a thin spot is closed by re-coating the area and re-measuring the same grid points.
Why record Shore D hardness at 24 hours as well as at 7 days?
Because a calendar does not measure anything. Shore D hardness at 24 hours and 7 days shows whether the film is still hardening, which decides when chemical washing can start. A floor that reads the same at both points is usually fully cured.
Can slip resistance be tested on site?
Only as a screen. DIN 51130 needs a ramp and a prepared sample, so the class stays a laboratory figure. On site, a slip resistance test method gives a relative number per zone. It shows whether the floor is consistent and whether it still matches the approved panel; that is all it can do.
What surface flatness and fall does a food plant floor need?
No gap over 3 mm under a 3 m straightedge, falls of 1:80 to 1:100 across the production floor, and no standing water 30 minutes after a water test. Photograph the test with the drain in frame, because ponding disputes are won with that photograph.
What happens if floor acceptance testing finds a failure?
The area is repaired to the same specification and re-tested at the same locations, and the new reading joins the report with its date. A failed result is closed by evidence, not by a discount. Keep the retention until the re-test passes, and record who signed off the repair.
When does the warranty start?
On the acceptance date: the warranty start date is the day the owner signs. A warranty dated from application hands the owner a shorter period than the one being paid for. Write the date into the acceptance sheet, not into a separate letter.
Why food plants work with Kaida Paint
Kaida Paint formulates and manufactures epoxy, polyurethane, cementitious urethane and MMA systems for food processing flooring, and we expect to be tested. Acceptance is part of the delivery, not an argument after it.
- We publish the thickness limits, cure windows and test methods for each system, so the acceptance criteria can be written before the material ships.
- We supply the full build from one formulation family: primer, body coat, broadcast, topcoat and coving, which keeps a failed test attributable to one supplier.
- Our technical team will attend the mock-up and the acceptance testing, and record the same numbers the owner records, including the abrasion test floor panel values where the specification calls for them.
- If a test fails, we repair the area and re-test it rather than negotiating the criterion.
Send your specification and the areas you want tested, and we will return a proposed acceptance plan with sampling points, instruments and pass criteria, plus a printable acceptance record sheet for the site.








 English
 Spanish
 Portuguese
 Arabic
 French
 Italian
 Russian
 Indonesian
 Swedish