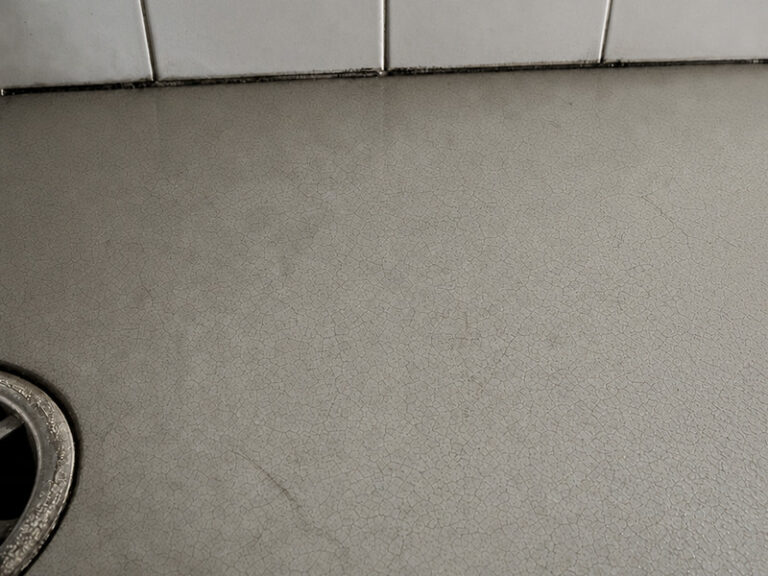
Thermal shock flooring is the failure that follows a temperature step, not a temperature. A floor that sits at 80 °C is comfortable; a floor that goes from 10 °C to 80 °C in ninety seconds, twice a shift, is being tested in a way no data sheet describes well.
Dairy and brewery plants produce that step more often than any other food sector, because hot water is the cleaning medium and the floor is the thing it lands on. The damage is concentrated, predictable and easy to misread as bad resin.
This article explains the mechanism, shows how the crack pattern identifies it, compares the build-ups that survive it, and sets out what to specify so the next floor is not another three-year experiment.
What thermal shock does to a resin film, in plain terms
A resin film and the concrete under it expand at different rates. When the surface heats faster than the slab, the film wants to grow and cannot, because it is bonded. The stress lands on the bond line and on the film itself.
Thin, rigid films have the least tolerance. A 0.5 mm epoxy has very little capacity to move. A rapid temperature change of 70 K in a minute is enough to start a crack at the weakest point, which is almost always a drain collar or a wall junction.
The same arithmetic applies to the bond. A thermal shock flooring that starts as a hairline at a collar will pass a visual inspection for two years, because the film is still bonded either side of the crack. A thermal shock flooring also shows in the primer before it shows in the surface. The bond layer is thin and has the least reserve, so a floor that is starting to fail will pull off at the dolly long before a crack appears.
The mechanism also explains why a floor can look perfect for two years and fail in the third, and why steam cleaning floor damage accelerates it. Each cycle leaves a little residual strain, and the film accumulates damage until the crack becomes visible.
Why dairy plants see it first
Dairy cleaning is hot by design. Caustic at 70 to 80 °C, an acid step, a rinse, and a sanitizer, repeated on a fixed cycle. The floor is wetted with hot liquid, then cools, then repeats.
The dairy floor failure pattern is consistent: cracks radiating from drains, dishing around the base of tanks, and a ring of loss around every penetration. The field of the floor is usually intact, which is why the first repair attempt often works and the second does not.
A dairy also washes cold. The rinse that follows the caustic step drops the surface temperature by 40 K in a few seconds, and that drop pulls the film rather than pushing it. A dairy floor failure that looks like a chemical attack is often the cold half of the cycle doing the work. A thermal shock resistant floor in a dairy has to tolerate both the step and the chemistry. That combination narrows the field to two families, and only one of them is economical at the thickness required.
Why breweries see it differently
Brewery cleaning is hot and intermittent. A brewhouse may be washed at 80 °C after a brew, then stand wet and cool for hours. The step is bigger, the frequency lower, and the chemistry includes caustic and acid at similar strengths.
The brewery floor damage signature is a crack that follows the drain run and the tank plinths rather than radiating. Where a floor is washed with a hose, the damage also concentrates where the jet lands.
The pattern of thermal shock flooring in a brewery follows the cleaning schedule rather than the layout. A brewery also runs cold processes next to hot ones: a cold liquor tank beside a kettle, a cellar at 12 °C beside a washdown at 80 °C. The floor between them sees a gradient rather than a step, and that is often where a thermal shock flooring begins.
Steam cleaning makes it worse. Steam cleaning floor damage delivers a local surface temperature far above the water temperature, and the area under the lance can exceed 100 °C while the slab stays at 15 °C. A brewery floor damage that looks like a chemical stain is often a steam burn: the film has blistered from below and the colour has changed with it.
That local step is why a floor that survives a hot hose can still fail under a steam lance, and why the cleaning method belongs in the specification as much as the chemical list.
Reading the crack pattern on site
Three patterns tell three stories. Cracks radiating from a fixed point indicate a local heat source. Cracks following a line indicate movement at a joint or a slab edge. Crazing across a whole bay indicates a film that is too rigid for the cycle.
A brewery floor damage survey should record the distance from the drain to the first crack as well as the direction. Distance tells you how far the restraint reaches, and that number decides whether a collar repair is enough or the whole bay is involved. The crack pattern also tells you the depth. A crack that stops at the topcoat is cosmetic; one that reaches the primer has already broken the bond, and water will finish the job.
Photograph the pattern with a scale, map it on the drawing, and compare it with the drain positions. The comparison is usually enough to separate thermal damage from a moisture problem, which looks similar at a glance.
Table 1: Pattern, likely cause and first check.
| Pattern | Likely cause | First check |
|---|---|---|
| Radiating from a drain | Local thermal step | Cleaning temperature and lance distance |
| Following a joint or slab edge | Movement under the film | Joint detail and slab curing |
| Crazing across a bay | Film too rigid for the cycle | Build-up and thickness |
| Cracks plus hollow ring | Bond loss, then thermal cycling | Pull-off at the edge |
Which build-ups actually survive
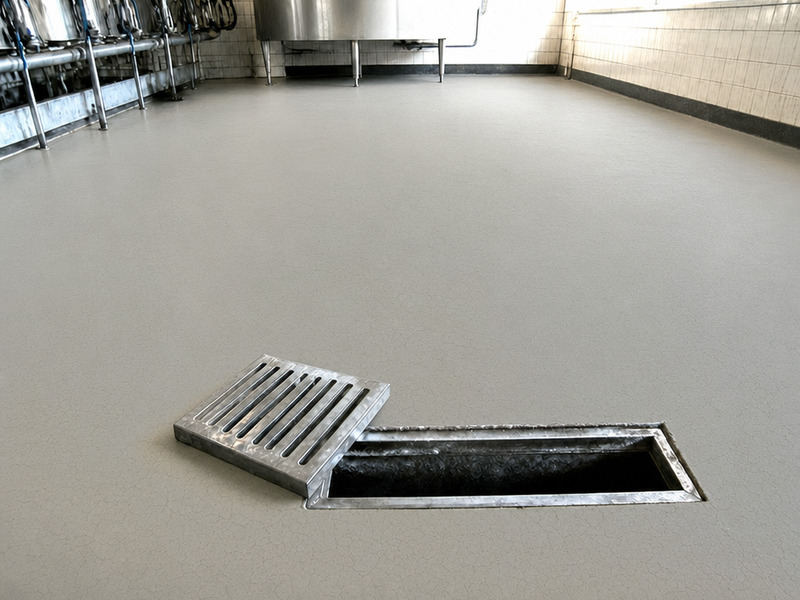
Figure 1: Crazing across a whole bay points to a film that is too rigid for the cycle, not to a bad batch.
Two families tolerate the step: a thick cementitious urethane, and a flexible polyurethane at a heavier film weight. A standard epoxy does not, whatever the data sheet implies about temperature resistance.
A cementitious urethane at 6 to 9 mm works because the film is thick enough to spread the strain and flexible enough to move with the slab. It is also the only family that combines the step with lactic acid and caustic at the same time.
A thermal shock resistant floor does not have to be thick everywhere. A room that is washed hot at the drain and dry at the door can carry a thinner film in the dry zone, and splitting the build-up that way is usually cheaper than a uniform heavy system.
A polyurethane at 2 to 4 mm handles the step in moderate duty. It is a good thermal shock resistant floor for a packaging hall or a filling room, and a poor one for a room washed at 80 °C with a steam lance.
The two are usually quoted together, and the pair is what a quotation should state: millimetres and the family. A number without the family means nothing, because 6 mm of a rigid film and 6 mm of a flexible one behave differently at the same drain. Thickness is not a substitute for flexibility, and flexibility is not a substitute for thickness. The pair is what buys service life.
Where the damage starts, and why it is always a detail
A drain collar, a wall cove, a tank plinth and a door threshold all restrain the film. Restraint plus heat equals stress concentration, and stress concentration equals the first crack.
A second detail matters as much for any thermal shock resistant floor: the junction between the floor and a stainless kerb. Where the kerb is bolted after the resin is laid, the fixing holes are a thermal crack waiting to happen. Steel moves differently from resin, and a hard joint between them concentrates stress in exactly the place a hose is aimed. The detail therefore has to allow movement rather than fight it. A cove with a radius, a collar that is formed rather than cut, and a movement joint at the wall are the three that matter most.
A dairy floor failure is rarely a materials problem alone. The floor that fails at year three usually had a detail that restrained movement, a build-up that was too thin for the cycle, or a cleaning routine that was never written down. Where a floor has already failed at a detail, recoating the field does nothing. The repair has to rebuild the detail, which is a day of work per location, not an hour.
What a specification should say about temperature
Any thermal shock flooring specification that names only a maximum temperature is incomplete. Name the cleaning temperature, the method, and the frequency. A floor specified for 60 °C water and washed at 85 °C with steam is a specification error, not a product failure.
Ask for the thermal cycling test result rather than a maximum temperature. A single exposure to 90 °C proves very little; two hundred cycles from 10 °C to 80 °C proves something a plant can use.
Require the detail at every drain and plinth to be drawn at 1:5 before work starts. Most thermal shock flooring projects that fail at year three failed at the drawing stage, not on site, and a rapid temperature change that starts at a collar proves it.
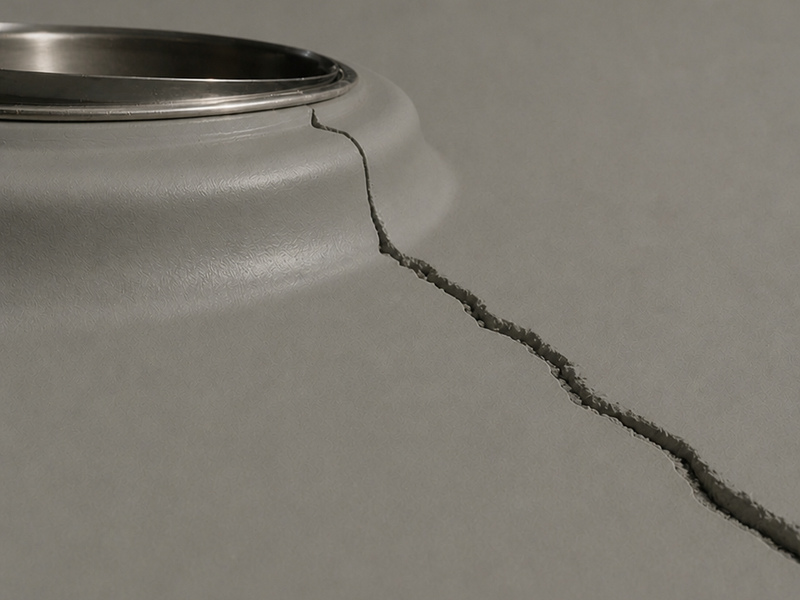
Figure 2: A crack that starts at the collar is telling you where the restraint is, not where the resin is weak.
Repairing a floor that has already been through it
Cut back to sound material, form a new collar, and use the same family as the replacement system. A patch of epoxy inside a urethane floor will fail at the boundary within a season, and the failure will look like a thermal crack even though the cause is a mismatch of families.
Where the pattern is widespread, the honest answer is a new build-up rather than another repair. Three repairs in five years usually cost more than one replacement, and the third repair happens during a production week.
Every thermal shock flooring record should include the cleaning temperature at the time of failure, because that number is what separates a design error from a change in practice. Record the repair locations and dates, and add the rapid temperature change history to the same sheet. Keep that sheet with the warranty documents, because a claim about temperature is hard to settle without a cleaning history on both sides. The record is what turns the next rapid temperature change into a known quantity, and it is the first thing an auditor asks for after a steam cleaning floor damage incident.
Table 2: Build-up against cleaning regime.
| Cleaning regime | Build-up that holds | Build-up that fails early |
|---|---|---|
| Warm water, 40–50 °C, daily | Epoxy 1 mm or PU 2 mm | Thin sealer only |
| Hot water, 70–80 °C, daily | Urethane cement 6 mm | Epoxy 0.5 mm |
| Steam lance, local | Urethane cement 9 mm | Any thin film |
| Hot water plus acid CIP | Urethane cement 9 mm | PU 2 mm |
Table 3: What to ask for in the quotation.
| Item | Evidence to request |
|---|---|
| Thermal cycling | Test report stating the temperature range and the number of cycles |
| Chemical resistance | Medium, concentration, temperature and duration |
| Detail at drains | 1:5 drawing with the collar and the fall |
| Thickness | Nominal and minimum, with the measurement method |
Frequently asked questions
What temperature counts as thermal shock?
There is no single number, because the damage depends on the step and the speed. A 40 K change in a minute will damage a thin rigid film, while the same film may survive 70 °C if it is reached slowly. Ask for the cycling test, not a maximum temperature.
Why does the floor crack around drains first?
Because the drain collar restrains the film in every direction, and it is where hot water collects. Restraint plus heat is the definition of stress concentration, so the first crack appears there.
Can a thermal-shock crack be repaired?
Yes, if the cause is local and the build-up is right. Cut back to sound material, reform the collar, and use the same system family. If the pattern is widespread, a repair will fail at the boundary and a replacement is the cheaper route.
Is steam cleaning always a problem for resin floors?
Not always, but it is the most demanding routine a floor can meet. A cementitious urethane at 9 mm handles it; a thin epoxy does not. If steam is part of the regime, say so in the specification.
How thick does a cementitious urethane need to be?
Six millimetres is the common minimum for daily hot washdown, and nine millimetres where steam or acid CIP is involved. Below six the film loses the ability to spread strain, and the detail work has to carry more of the load.
Does thermal shock show up in the first year?
Rarely. The damage accumulates, which is why a floor can pass its first winter and fail in its third. A cycling test and a detail review at handover tell you more about the next five years than a visual inspection. A cycling test on a sample is the cheapest way to get that evidence before the work starts.
What is the difference between thermal shock and thermal movement?
Shock is a fast step that concentrates stress at restrained points. Movement is the slower seasonal or process cycle that opens joints and cracks. Both are managed by the same principles: flexibility, thickness and details that allow movement.
Why food plants work with Kaida Paint
Kaida Paint supplies epoxy, polyurethane, cementitious urethane and MMA systems, and we will say which one your cleaning regime actually needs rather than which one is in stock. Send the cleaning temperatures, the method and a plan with the drains marked, and we will return a build-up by room with the detail at each collar. Where a thermal shock flooring has already failed, we will read the crack pattern from photographs and tell you whether the next step is a repair or a replacement.




 English
 Spanish
 Portuguese
 Arabic
 French
 Italian
 Russian
 Indonesian
 Swedish