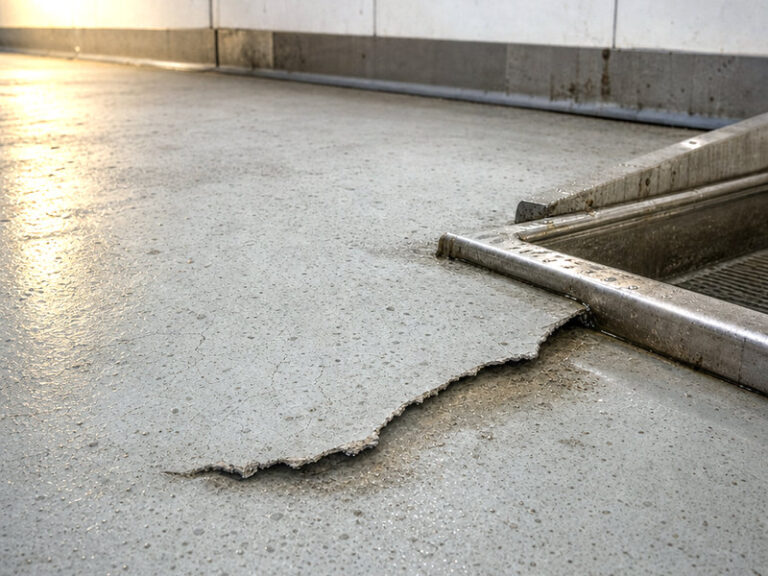
Epoxy lifting happens for one of three reasons: something pushes the film from below, the bond never formed, or the film moves further than the slab under it. The repair only holds when it addresses the one you have.
Moisture, contamination and thermal movement account for almost every case in a wet food room, and they look different on the floor. A dome, a flat sheet and a curled edge are three separate diagnoses, and testing them the same way is how a repair becomes a repeat.
This article separates the three, sets out the measurements that tell them apart, and describes the repair routes that survive a washdown regime. It also covers the specification lines that stop the same failure returning after the next refurbishment.
What lifting actually means, because it is three different failures
Lifting is a description, not a diagnosis. The same word covers a dome that appears overnight, a sheet that comes away at the wall, and an edge that curls up under a trolley wheel.
Each one has a different cause, and each needs a different repair. Treating all three as epoxy delamination wet area is why the same bay is repaired twice in two years.
The practical split is by depth and by pattern. A dome says something is pushing from below, and a dome that springs back is an osmotic blister in the making. A sheet says the bond never formed. A curl says the film is moving faster than the substrate.
Before any floor lifting food plant is diagnosed, photograph the pattern from standing height and again at 300 mm. The two views answer most of the question before a single test is run. A dome, a sheet and a curl also fail at different rates: the dome reappears in weeks, the sheet grows through the season, and the curl spreads one wheel at a time.
Cause one: moisture moving up through the slab
Concrete is not dry because it looks dry. A slab on grade holds water for months, and in a wet process room the floor is also being wetted from above every shift.
When moisture vapour transmission meets a film with a low permeability, the vapour has nowhere to go. It collects at the weakest point of the bond line and pushes. That is the mechanism behind an osmotic blister, and it explains why blisters cluster near drains and along walls where the slab stays wettest.
The number that matters is relative humidity at depth, not at the surface. A probe reading above 75 percent is a warning; above 85 percent the film choice has to change, not just the primer.
Surface tests with a plastic sheet tell you the slab is wet. They do not tell you how wet at 40 mm, which is where the vapour is coming from.
That is why a moisture vapour transmission reading is taken with probes sealed at depth, left to equilibrate for the time the method requires. An osmotic blister that reappears after a repair in the same place is usually telling you the reading was taken at the surface. Where ponding water keeps the slab wet, the moisture vapour transmission figure at depth tracks the cleaning routine rather than the weather, and a epoxy lifting that returns every winter is usually a drainage problem wearing a coating problem’s clothes.
Cause two: contamination and a weak surface layer
A bond fails at the interface, and the interface is only as strong as the weakest thing on it. Oil, fat, released curing compound, laitance and dust all sit between the resin and the concrete.
Substrate contamination is the most common cause in food plants because the room is never empty. A grinder passes over a patch of fat, the wheel loads up, and the surface underneath is polished instead of opened.
The test is simple: grind a 300 mm square, wipe it, and look at the water break. If water beads, there is contamination. If it wets out evenly, the surface is ready.
Where contamination is deep, mechanical preparation has to remove it rather than spread it. On a epoxy lifting repair, the first pass often makes the problem worse: the wheel picks up fat and polishes the next metre. The same applies to substrate contamination that is only washed: detergent residue sits on the surface like oil, and a primer failure applied over it fails as a film rather than at the interface, which misleads the next blister repair. That means a scarifier or a shaver, followed by a second pass, not a single sweep with a grinder.
Cause three: thermal movement and cure stress
A thin film heats faster than the slab under it. In a room washed with 80 °C water, the surface can be 30 °C warmer than the concrete for a few minutes, twice a shift.
The film expands, the bond holds, and the stress concentrates at the perimeter and at any hard edge. That is how epoxy lifting starts at a wall or a plinth rather than in the middle of a bay.
Cure stress does the same thing on a shorter timescale. A primer failure that is applied too thick, or over a sealed surface, shrinks as it cures and pulls the film inward before it has any strength.
In a room that sees both, the two mechanisms add. A primer failure that looked sound in a cool week can lift in the first hot washdown, because the two stresses arrive together and the bond has no reserve. A floor that survived five years of washdown can fail in the first month after a new high-pressure cleaning regime is introduced.
What a blister, a sheet lift and a curl look like on site
An osmotic blister is a dome with sound material around it. Tap it and the sound is hollow at the centre, solid at the rim, and the dome usually springs back when pressed.
A sheet lift is a flat area that has come away from the substrate. It sounds hollow across its whole width, and the edge is where the water gets in. This is the pattern that produces epoxy delamination wet area reports after a washdown, because the film moves under a hose.
Curls are the plainest form of epoxy delamination wet area to read, because the field tells you nothing and the edge tells you everything. The field is bonded, the edge stands proud, and a trolley wheel catches it. Curls are the most common form of floor lifting food plant in a room with heavy wheeled traffic. Curls are also the cheapest to fix early and the most expensive to ignore, because water enters under the lifted edge and the hollow area grows from there. Any epoxy delamination wet area that reaches a wall or a plinth should be treated as a perimeter problem until the tap test says otherwise.
Table 1: Reading the pattern before testing.
| Pattern | Sound when tapped | Most likely cause | First test |
|---|---|---|---|
| Dome, solid rim | Hollow centre | Vapour pressure from the slab | RH probe at depth |
| Flat sheet, hollow across | Hollow throughout | Bond never formed | Pull-off at the edge |
| Edge curl | Solid except 50 mm | Movement or cure shrinkage | Straightedge and photo |
| Star cracks with lift | Hollow at the arms | Point load over a void | Core sample |
Testing before you repair, not after
Table 2: The three measurements, the instrument and the pass criterion.
| Measurement | Instrument | Pass criterion | What a fail means |
|---|---|---|---|
| Relative humidity at depth | Probe sealed in a drilled hole | 75 percent or below for a standard epoxy | Vapour-tolerant primer or a different system |
| Adhesion | Pull-off dolly, 50 mm | 1.5 MPa minimum, or concrete failure | Preparation or contamination |
| Extent of hollow area | Tap test on a numbered grid | No hollow outside the repair boundary | The repair is too small |
Three measurements separate the causes. Relative humidity at depth, adhesion by pull-off, and the extent of the hollow area by tap test on a grid.
A pull-off below 1.5 MPa, or a failure that leaves a clean concrete face, points to substrate contamination or a weak surface. A failure inside the film points to cure or application.
The grid matters as much as the readings. Mark it on a drawing, number each point, and record the result. Without that, a blister repair designed from memory will miss the area that is actually moving. A floor lifting food plant survey without a grid is an opinion, and the second survey is what turns it into evidence. The grid also gives the next inspection a baseline: a second survey six months later shows whether the hollow area is stable, and that comparison is what turns epoxy lifting from a surprise into a maintenance item.
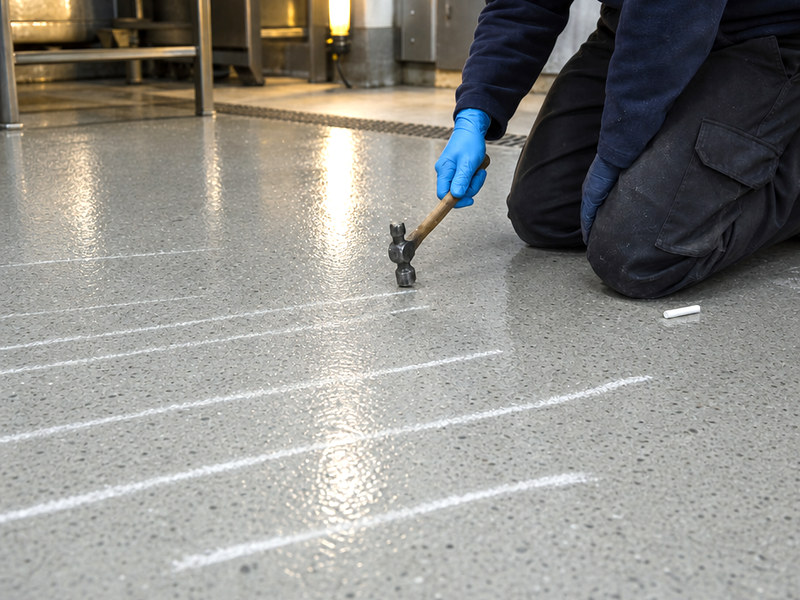
Figure 1: A chalk grid turns a tap test into evidence you can compare next year.
Where the water is coming from, and why it is usually the drain
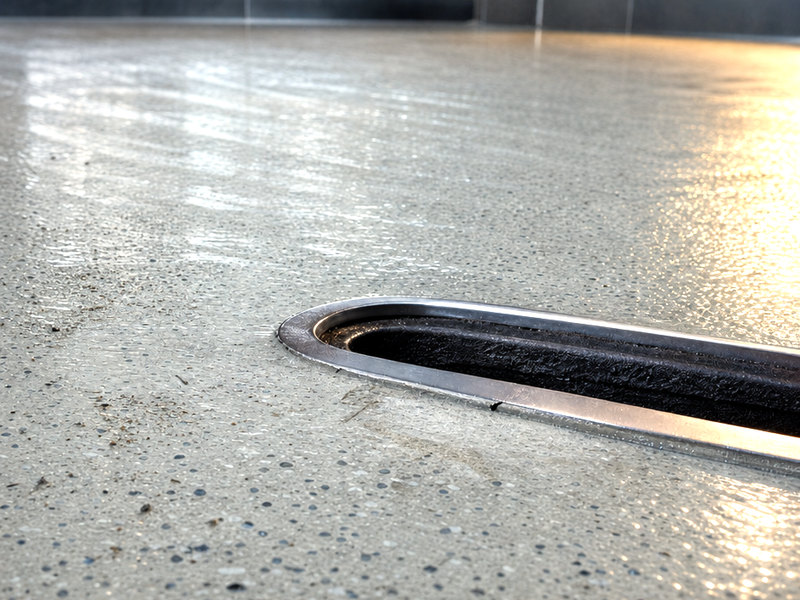
Figure 2: A fall that reaches the outlet, and a gully set low enough to let it, is the cheapest repair in this article.
Ponding water is the quiet accelerator. Water that stands for an hour after washdown has time to enter every defect, and the drain surround is where it stands longest.
A fall of 1:80 to 1:100 across the room, with a local 2 percent within a metre of the outlet, keeps water moving. Where the fall runs the wrong way, no coating survives the sequence of wet and dry, and ponding water does the rest of the damage quietly.
Check the drain invert as well as the floor. A gully set 10 mm high leaves a ring of water that never drains, and that ring is where the first blister appears. Any report of ponding water should be checked with a straightedge and a level before the resin is blamed, because the floor is doing what the fall tells it to do.
Repairs that hold, and repairs that come back
Any epoxy lifting that is repaired without its cause is a scheduled repeat. Cut back to sound material, prepare the exposed concrete as if it were a new floor, and prime with a product rated for the measured moisture.
For a local defect, a blister repair with a moisture-tolerant primer and a small batch of the same system is durable. For a sheet lift covering more than a few square metres, the area has to come out and the whole bay be re-laid.
Where humidity at depth is the driver, the repair changes: a moisture suppression primer, or a system that tolerates vapour, or a surface drain detail that keeps water off the slab.
Table 3: Repair route by cause.
| Cause | Repair that holds | Repair that returns |
|---|---|---|
| Vapour pressure | Vapour-tolerant primer plus breather detail | Same thin film over the same slab |
| Contamination | Scarify, test water break, re-prime | Grind and patch over the oil |
| Thermal movement | Flexible system with movement joints at edges | Rigid film with no perimeter detail |
| Standing water | Correct the fall and the drain invert | Recoat over the low spot |
Specifying the replacement so the same failure does not return
The specification should name the moisture test and the result that triggers a change of system. Without that line, the contractor is free to assume the slab is dry.
It should also name the preparation standard, the primer for each moisture band, and the detail at the wall, the drain and every plinth. Most epoxy lifting starts at a detail, and details are the first thing a price cut removes.
Finally, require the acceptance measurements before handover: pull-off at a stated rate, thickness, and a photographic record of the grid. A floor that is tested is a floor that can be maintained. Where epoxy lifting has happened once, put the moisture band and the detail at every drain into the next floor lifting food plant specification, and make the contractor report both back at handover.
Where the room cannot stop, the sequence matters as much as the system. Two half-bays, a night shift and a moisture-tolerant system will outperform a full closure with the cheapest film on the list.
Frequently asked questions
Can epoxy lifting be repaired without removing the floor?
Only where the hollow area is small and the cause is local. Cut back 50 mm beyond the hollow, prepare the concrete, and re-prime for the measured moisture. If the hollow area covers a sheet, the film has to come out, because a patch over a moving sheet will lift again within a season.
Why does the floor lift only around the drains?
Because that is where water stands longest and where the slab is wettest. A drain set high, or a fall that runs away from the outlet, keeps a ring of water in place after every washdown. Correct the fall and the invert before you spend money on resin.
Does a moisture test really change the specification?
It should. A slab reading above 75 percent relative humidity at depth needs a vapour-tolerant primer or a different system. Above 85 percent, a thin epoxy is the wrong purchase whatever the data sheet says, and the honest answer is to change the build-up.
How long should an epoxy floor last in a wet food area?
Five to eight years is a reasonable expectation for a well-prepared 1 mm epoxy in a wet room with correct falls and a sane cleaning regime. Half that, or less, usually means moisture, contamination or thermal shock rather than bad resin.
Is a thicker epoxy the answer to lifting?
No. Thickness does not fix a bond that never formed, and a thicker rigid film carries more thermal stress. Where lifting is the problem, the answer is preparation, primer selection and details, not more millimetres.
What is the difference between a blister and a delamination?
A blister is a dome with a sound rim, pushed up by vapour. A delamination is a flat separation where the bond failed. They look different, they are tested differently, and they are repaired differently.
Can we keep production running while the floor is repaired?
Yes, in most wet rooms, if the work is split into bays and the cure window fits the shift pattern. The constraint is usually the primer and the first coat, which need a dry surface and a stable temperature for a few hours.
Why food plants work with Kaida Paint
Kaida Paint formulates epoxy, polyurethane, cementitious urethane and MMA systems for food plants, and we supply the primer that matches the moisture reading rather than the one that matches the price. Send a plan with the area schedule and the cleaning routine, and we will return a build-up by zone with the moisture band and the detail at each drain written in. Where a epoxy lifting has already happened, our technical team will read the pattern from photographs before anyone quotes a repair, and we will say when the honest answer is a blister repair and when it is a new build-up.



 English
 Spanish
 Portuguese
 Arabic
 French
 Italian
 Russian
 Indonesian
 Swedish