An industrial polyurethane floor coating needs a concrete surface profile of CSP 3 to 5, which is a roughness you can see and feel rather than a polish.
Too smooth and the coating slides off under traffic. Too rough and the film bridges the peaks, leaving pinholes and a thin coat over the valleys. The range exists because both failures are real.
This article explains what CSP means, which methods reach 3 to 5 on real slabs, how to measure the result without a laboratory, and what a deeper profile will not fix.
The short answer, and where it comes from
CSP stands for concrete surface profile, and the scale runs from 1 to 10 on a set of reference plates. A value of 3 to 5 describes a surface with visible texture and no loose material.
The number is not arbitrary. Coatings in the 300 to 600 micron range need a key deep enough to hold them and shallow enough that the film covers the peaks.
An industrial polyurethane floor coating at 500 microns sits in that band. The target moves with the build: a thin sealer needs less key than a 6 millimetre trowelled screed, and Table 1 sets out each case.
Table 1: Which profile suits which system.
| Sistema | Build | Target CSP |
|---|---|---|
| Thin sealer | 100-200 microns | CSP 2 |
| High-build coating | 300-600 microns | CSP 3-5 |
| Self-levelling mortar | 3-4 mm | CSP 3-4 |
| Trowelled screed | 6-9 mm | CSP 4-6 |
| Broadcast system | 2-3 mm | CSP 3-4 |
The two ends of that table fail in opposite ways. A coating on CSP 2 has no key and lifts at the edges; an industrial polyurethane floor coating on CSP 7 bridges the peaks, thins over them and wears through in months.
Read that table as a sequence rather than a preference. A screed can tolerate a rougher surface because its own thickness absorbs the peaks; a coating cannot.
What the CSP scale actually describes
The scale is visual. Ten moulded plates show increasing surface roughness, from a glass-smooth finish to a surface like coarse gravel, and a surveyor compares the floor with the plates by eye and by touch.
Profile depth is not the same thing as amplitude. The plates show a combined effect of peak height, density and openness, which is why a deep but sparse profile can read lower than a shallow but dense one.
A surface that has been ground to a shallow but uniform surface roughness often bonds better than one that has been blasted unevenly and left with polished patches. Uniformity is the property that matters, and it is the one a comparator plate is worst at showing.
That is also why two slabs with the same measured amplitude can behave differently. The pattern matters as much as the number.
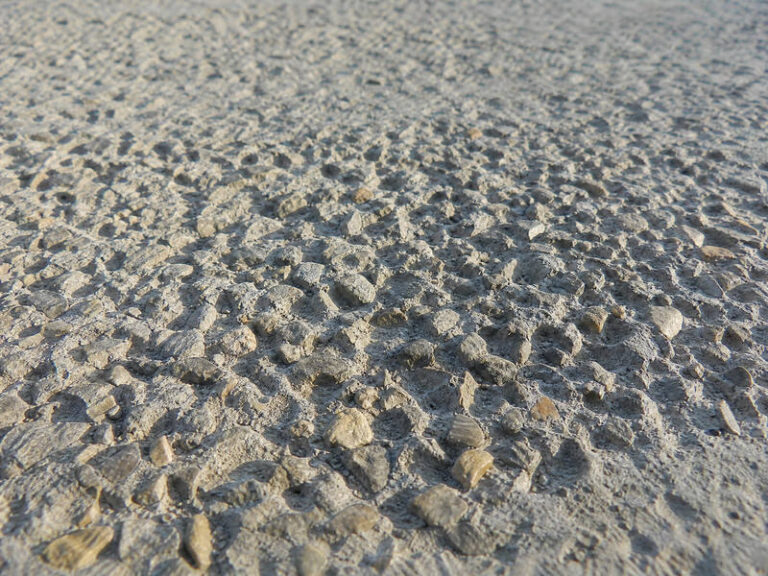
Profile depth can also be described by the aggregate it exposes. At CSP 3 the fine aggregate is visible, at CSP 4 the coarse aggregate starts to show, and at CSP 5 the stones stand proud with open pits between them.
For practical purposes, CSP 3 looks like a fine sandpaper texture across the whole surface. CSP 5 looks like exposed aggregate with visible pits between the stones.
Why a polyurethane needs the key
Adhesion on concrete is mostly mechanical. The resin wets the pore structure and the cut aggregate, then cures into it, and the bond strength depends on how much surface the resin can reach.
A power-trowelled slab presents a dense, closed skin with little open pore structure. Coating it without opening that skin produces a bond that can be measured on day one and fails within a year.
The profile also provides somewhere for the primer penetration to go. A primer on a smooth surface sits on top and forms a weak interface; on a profiled surface it penetrates and anchors.
What the profile cannot do is compensate for weak concrete, and a slab that is still wetting up is the other condition no profile fixes: a moisture test result settles that before the machine arrives. A soft, dusty or contaminated surface will fail whatever the roughness, and no primer penetration fixes a friable substrate.
There is a second reason for the range, and it is about the primer rather than the body. A dense surface limits primer penetration to almost nothing, so the primer sits on the slab instead of anchoring in it, and the whole build depends on a surface bond that water will eventually reach.
That is why the profile requirement appears in the primer clause as often as in the body clause. An industrial polyurethane floor coating is a build of three or four layers, and the weakest of them decides the life of the floor.

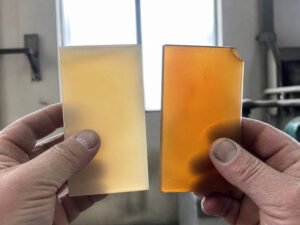
Figure 1: the plate is pressed down on one corner, so the texture shows through the gap under the other three.
Shot blasting: the method that reaches CSP 3-5 reliably
Shot blasting fires steel shot at the surface, cuts the concrete, and recovers the shot and the dust in the same pass. It is the fastest way to profile a large open floor.
On a medium-hard slab, a single pass with a 250 millimetre machine typically produces CSP 3 to 4. Hard, dense concrete often needs a second pass or a larger shot.
The method opens the pores rather than smearing them, which is why it produces the best bond of the mechanical options. It also removes laitance, curing compounds and weak surface layers in the same operation.
Speed is the other argument for shot blasting. A 250 millimetre machine profiles 300 to 500 square metres in a shift on an open floor, which is several times what a grinder achieves over the same area.
On a live building, the same machine can run in a closed bay with extraction and leave a surface ready for primer the same day. That combination of speed and open pore structure is why it dominates industrial polyurethane floor coating work on large slabs.
The limits are physical. The machine cannot work within 150 millimetres of a wall, around a plinth or in a doorway, and those areas need a hand tool afterwards. They are also the areas where coatings fail first.
Dust control matters. A machine without effective extraction leaves a fine layer that must be removed before priming, and that layer is easy to miss on a busy site.
Diamond grinding: clean, but usually shallower
Diamond grinding cuts the surface with segmented diamond tooling and produces a clean, flat, dust-controlled finish. It is the standard method for coating removal and for light profiling, and it is the preparation that a polyurethane over epoxy renovation depends on.
A standard segment set reaches CSP 2 to 3. Getting to CSP 4 or 5 needs a coarser bond or a different tool, and many contractors do not carry one.
That is the most common specification failure we see: a floor specified at CSP 4, ground with a standard tool, and accepted at CSP 3 because nobody checked.
One practical compromise on a mixed floor is to blast the open area and use diamond grinding at the perimeter, accepting a lower profile in a strip that will also see less traffic. The primer coat stage then has to cope with two profiles on one floor. Document the strip on the drawing so nobody assumes it was blasted.
Grinding is still the right method in tight areas, on elevated slabs with weight limits, and where the surface must stay flat. On those jobs, specify the tool as well as the outcome.
Why acid etching cannot deliver a measurable profile
Acid etching delivers no measurable CSP. It was the standard garage-floor preparation in the 1980s, and it survives on the back of retail packs because it is cheap to buy and easy to specify.
Acid attacks the cement paste and leaves the aggregate standing proud. The result is a surface that looks rough but has a weak, friable layer at the top and no consistent profile depth.
The same objection applies to any chemical etcher sold as a substitute. If the preparation cannot be graded on a surface roughness comparator and cannot be recorded in microns, it cannot be specified, and an industrial polyurethane floor coating deserves better than that.
It also leaves residue that must be neutralised and rinsed, and any left behind will attack the primer. On a large floor the rinse water is a disposal problem in its own right.
Retail packs still carry the instruction, and that is the only place acid etching belongs in a modern specification. It has not been an accepted method for an industrial polyurethane floor coating for thirty years.
Where a client has already etched a floor, the remedy is mechanical removal of the weakened layer. That costs more than blasting would have done at the start, and it is a conversation worth having before the acid goes down rather than after.
For an industrial polyurethane floor coating we do not accept acid etching as preparation. It is cheaper than blasting on the day and more expensive over the life of the floor.
Measuring the profile without a laboratory
Three tools cover almost every site: the comparator plate, a replica tape and a sand patch. Each answers a slightly different question.
The comparator plate is the fastest and the least precise. It is a judgement, and two people can disagree by one grade on the same floor.
Replica tape pressed onto the surface and read with a micrometer returns a depth in microns. It is repeatable, cheap and takes a minute per location.
Table 2: Three ways to check a profile, and what each is good for.
| Metodo | Output | Best use |
|---|---|---|
| Comparator plate | CSP grade | Quick check across an area |
| Replica tape | Microns | Recordable, repeatable evidence |
| Sand patch | Macrotexture depth | Large areas, road-type texture |
A bond test on the primer is the cheapest way to close the loop between the recipe on paper and the floor in front of you. Nothing else proves the two are the same.
Replica tape also settles the argument about surface roughness between two grades. A reading of 300 to 600 microns is a workable profile for an industrial polyurethane floor coating; below 200 microns the surface is closer to CSP 2 than CSP 3.
Whichever tool is used, record the locations. A profile result that cannot be traced to a place on a plan is not evidence, whatever the number.
What the profile can hide: weak layers and compounds
Laitance is the weak, cement-rich layer that rises to the surface of a new slab. It looks like concrete and behaves like chalk, and a coating bonded to it will fail at the laitance rather than at the concrete.
Blasting removes it. Grinding can polish it instead of removing it, which is another reason the method matters more than the pass count.
Curing compounds are worse, because they are designed to be a barrier. A sodium-silicate or resin-based compound will sit between the slab and the primer and no amount of profiling will defeat it.
Both problems show up in the same place, which is at the interface the primer penetration is supposed to create. A primer that cannot enter the pore structure has nothing to grip, and a primer over a compound is gripping the compound.
The test is a water droplet. If it beads on a freshly ground surface, something is still there. If it soaks in within a minute, the surface is open.
Where a slab has been treated with a curing compound, the only reliable answer is mechanical removal. Chemical strippers exist and their residue is a further risk.
When to test the bond, and how
A bond test belongs after the primer has cured and before the body coat is ordered. It tells you whether the preparation worked while there is still time to change course.
The field method is a pull-off dolly glued to the surface and pulled with a gauge. A result above 1.5 megapascals with the failure in the concrete is a pass.
A simpler check is a knife test on a cured patch: cut a cross, lever a corner, and see whether the film tears or peels. It is qualitative, and it catches gross failures.
Take the bond test in the areas that were hardest to prepare, not the ones that look best. A result from a well-blasted bay tells you what the machine can do; a result from an edge tells you what the floor will do.
Whichever method is used, one test per 500 square metres plus one in every suspect area is a reasonable minimum. A single result on a large slab is a story, not data.
Writing the requirement so it can be checked
A specification should name the profile, the method, the acceptance test and the areas the machine cannot reach. Three of those four are usually missing.
The edges clause is the one that saves most failures. State that hand tools are required within 150 millimetres of any vertical surface and that those areas are inspected before priming.
Table 3: A clause that a site can actually verify.
| Articolo | Requisiti | Check |
|---|---|---|
| Profile | CSP 3-5, uniform | Comparator plate, 1 per 200 m2 |
| Metodo | Blast or coarse grind | Tool record |
| Edges | Hand tooled within 150 mm | Visual before primer |
| Contamination | No dust or compound | Water droplet test |
| Bond | 1.5 MPa minimum | Pull-off after primer |
Where a client is comparing three quotes for an industrial polyurethane floor coating, the specification is what makes them comparable. Without a named profile and a named test, the cheapest quote is usually the one that skipped the preparation.
A clause like that fits on one page and removes most of the argument. It also lets a client compare two contractors on the same basis, which is the point of a specification.
Common mistakes on a real slab
Five mistakes account for most of the preparation failures we are called in to inspect, and the first is the most expensive because it is invisible at handover.
The first is specifying a profile without specifying a method, then accepting whatever the machine produced. On a hard slab that is often CSP 2.
The second is blasting the open floor and hand-grinding the edges with a fine disc, which leaves two different profiles on one floor. The perimeter fails first, and it is the area a client sees.
The third is priming over dust. A vacuum pass takes minutes and prevents a whole class of adhesion failure.
The fourth is measuring the profile in the middle of the best-looking bay and never running a bond test at all. Sample the areas that look different and test the bond there, because those are the bays that fail in year two.
A fifth is preparing a slab in winter without checking its temperature. Cold concrete blasts differently, grinds differently and takes a primer more slowly, and the profile on a 5 °C slab is not the profile the specification assumed.
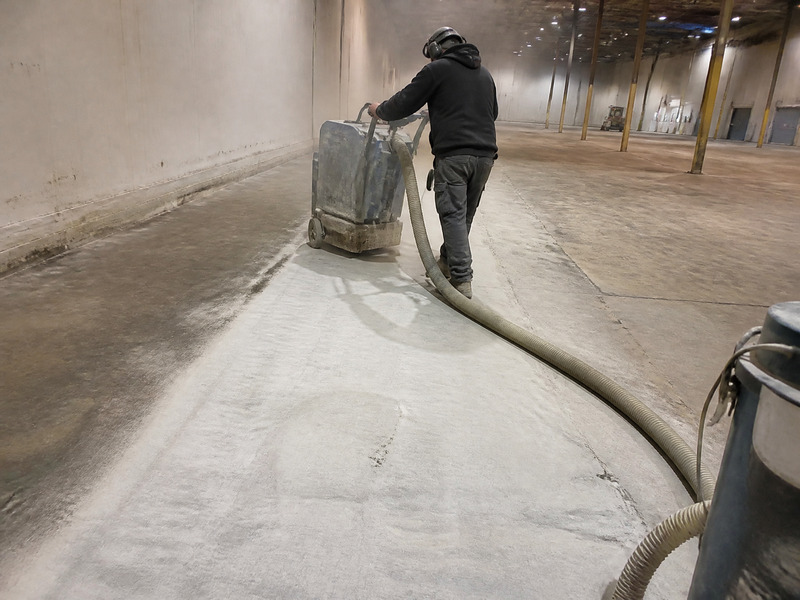
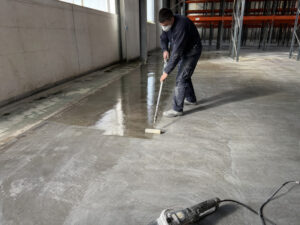
Figure 2: the shot blasting track runs diagonally across the bay, and an untreated strip is still visible along the wall.
Frequently asked questions
What CSP does a polyurethane floor coating need?
CSP 3 to 5 for a high-build coating at 300 to 600 microns. A thin sealer may accept CSP 2, and a trowelled screed wants CSP 4 to 6.
Can I use acid etching instead of blasting?
Not for a polyurethane coating. Acid leaves a friable surface and no measurable profile, and its residue attacks the primer.
How do I measure surface profile on site?
A comparator plate gives a CSP grade quickly; replica tape read with a micrometer gives a number in microns that can be recorded.
Does a deeper profile mean better adhesion?
No. Beyond the range the film bridges the peaks and thins over them, which produces pinholes and premature wear.
How do I know if laitance is present?
A water droplet that beads on a freshly ground surface indicates a closed or contaminated layer. Laitance also rubs off as a white powder.
What pull-off value shows the preparation worked?
A minimum of 1.5 megapascals, with the break in the concrete rather than at the interface. Below that the bond is the weak link.
Can a grinder reach CSP 4?
Only with coarse tooling. A standard 30 to 60 grit segment set typically reaches CSP 2 to 3, so specify the tool as well as the result.
Why food plants work with Kaida Paint
Kaida Paint writes the profile, the method and the acceptance test into every industrial polyurethane floor coating specification, and we will tell you when a slab needs blasting rather than grinding. Send the slab description, the area and the access constraints, and we will return the preparation clause and the primer that suits the profile you can actually achieve.


 English
 Spanish
 Portuguese
 Arabic
 French
 Italian
 Russian
 Indonesian
 Swedish