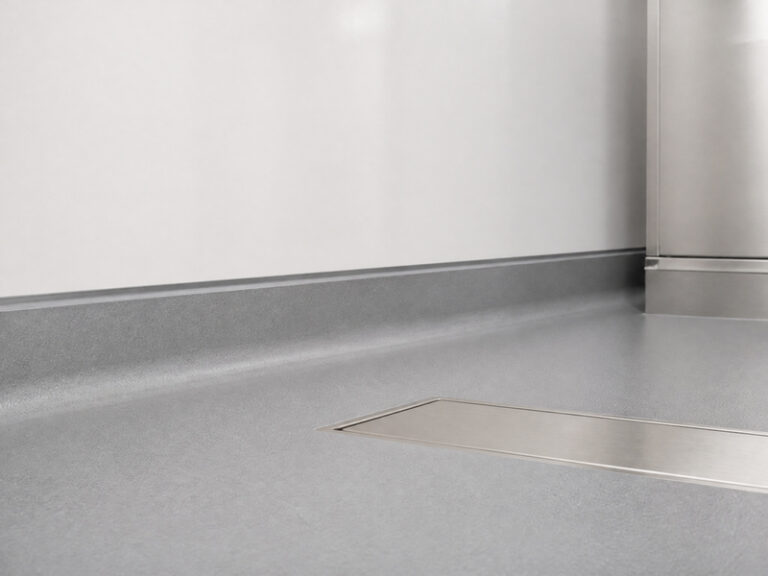
The answer for most food plants is a coved skirting resin floor with a 50 mm radius, a 100 mm cove height and a food grade polyurethane sealant at the head. That arc replaces the square corner, so a brush and a squeegee clean the perimeter in one pass and no soil traps remain at the base of the wall.
Four questions settle the detail: what radius, what cove height, which build-up, and which sealant closes the head of the cove. Each answer is a drawing decision that can be inspected after handover.
This page is written for plant engineers, maintenance managers and specifying consultants who draw or check junction details. After reading it you can set a radius by area, choose a build-up, name a sealant and write an inspection line a third party can verify.
1. Why coving is a hygiene requirement, not a finish detail
Coving is a hygiene requirement because a square corner is a geometric soil trap that cannot be swabbed in one pass. Two surfaces meet at 90 degrees, the last few millimeters of each are unreachable by a brush head, and any liquid that runs down the wall stops there.
The floor wall junction is also the part of a room that cleaning validation samples last and passes least often. A cured resin floor is not sterile; hygiene comes from cleanability plus cleaning validation. A junction that cannot be cleaned in one pass cannot be validated in one pass, however good the field looks.
A coved skirting resin floor removes the corner instead of covering it. The radius has no root, no shadow line and no change of plane that a squeegee crosses twice. The operator walks the perimeter once with a deck brush and the soil leaves with the water.
Coving also protects the wall. Impact from pallet trucks, bins and trolleys arrives low on the wall, across the band the cove covers. A monolithic fillet spreads that impact into the floor build rather than into a plaster edge that crumbles into a washdown area.
On projects we have supplied, the recurring failed swab location is the base of a square junction, not the open field of the floor. That is a pattern from handover inspections, not a laboratory result, and it repeats across plants with different products.
Coving is a hygienic detailing decision and a sanitary design requirement, not a finish. Its measurable outcome is one continuous surface from the field of the floor to a defined termination on the wall.
2. Cove radius: 50, 75 or 100 mm
Set the coving radius by cleaning method, not by taste: 50 mm where a hand brush does the work, 75 mm to 100 mm in high-care rooms and wherever a machine cleans. A coved skirting resin floor at 50 mm is the common minimum for a washdown area.
The reasoning is tool geometry. A hand brush with a 60 mm bristle head needs roughly 50 mm of arc to sit flat in the corner. A scrubber deck or a foam lance needs more room because the head cannot tilt, so the radius has to carry the tool around the turn.
Table 1. Cove radius by area and cleaning method
| Area | Cleaning method | Coving radius | Cove height | Why this radius |
|---|---|---|---|---|
| Dry store and dry production | Dry brush and damp mop | 50 mm | 100 mm | Smallest arc that opens the corner to a brush |
| Wet process, general | Hose and squeegee, 50-60 °C water | 50 mm | 100-150 mm | Standard washdown minimum |
| High-care and ready-to-eat | Foam, rinse, verified swabbing | 75-100 mm | 150 mm | Wide arc leaves no narrow root for soil |
| Machine-cleaned floor | Ride-on scrubber or deck brush | 100 mm | 150 mm | The machine head follows the full arc |
| Cold room | Low-pressure rinse, hand tool | 75 mm, flexible | 100 mm | Arc absorbs movement at the joint |
| Equipment plinth surround | Hand tool and foam | 50 mm | 100 mm | Access for the tool sets the limit |
Choose the smallest radius the cleaning method allows, because a larger radius is not free. A 100 mm cove on a 40 m perimeter takes up 4 square meters of floor area, and the fillet needs about four times the mortar volume of a 50 mm cove per linear meter. What it buys is stress distribution: a tight arc concentrates shrinkage and thermal movement into a short length of fillet, and a wide arc spreads it.
Height is the second number, and at the floor wall junction it sets where the arc stops. Typical practice is 100-150 mm above finished floor level. A 75 mm radius under a 100 mm cove height leaves very little vertical face below the head joint, so the two numbers are drawn together. At 100 mm the height is almost entirely consumed by the arc.
3. Three ways to build a cove
Three build-ups are in common use and they are not interchangeable: monolithic resin coving for washdown and high-care, a preformed strip for cold rooms and retrofits, and a sealant bead for dry areas only. They differ in material, in sequence and in what can go wrong.
Table 2. Three cove build-ups compared
| Build-up | How it is built | Bäst för | Limits | Inspection point |
|---|---|---|---|---|
| Resin mortar fillet, monolithic | Mortar troweled into the corner with a former, then body coat and topcoat carried over it as one film | Washdown, high-care, new build | Needs dry substrate and a set window before coating | No visible line between fillet and floor field |
| Preformed coving strip | PU or PVC strip bonded with adhesive, sealed at head and base | Cold rooms, retrofits, fast handover | Adhesive line is the weak point; corner must be flat | Tap along the strip for a hollow note |
| Sealant-formed cove | Sealant gunned into the corner and tooled to a radius | Dry areas only | Fails under washdown and cannot hold a large arc | Bond width at both flanks |
The monolithic fillet is the reference form of resin coving, with the coved skirting resin floor carried up the wall as one film. The sequence is fixed. Grind and vacuum both planes, then prime them. Trowel resin mortar into the corner to the stated radius with a coving former, and let it set. Then apply body coat and topcoat across floor and cove in one continuous operation.
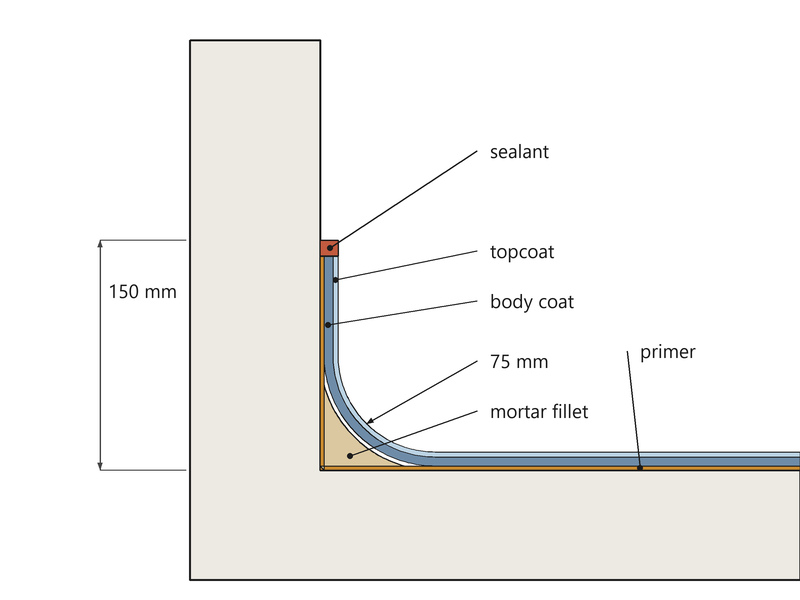
Figure 1. A 75 mm cove built as a resin mortar fillet: primer on floor and wall, mortar fillet, body coat, topcoat carried 150 mm up the wall, and a sealant head joint.
The preformed strip is bonded to a prepared corner with adhesive and sealed at the head and at the base. It is fast, it works at low temperature, and it is the usual choice in cold room flooring and in retrofits where the plant cannot wait for a mortar to cure. Its weakness is the adhesive line.
The sealant-formed cove is a bead tooled to a radius. It is acceptable only in dry areas and should never be drawn where the room is hosed. In a washdown area it fails within a season, because a bead with no backing and no bond width is asked to hold an arc that geometry will not support.
At the floor wall junction the coved skirting resin floor is judged at the head. The cove must terminate on a straight, level line at the height the specification states. A run taken up under a wall coating with no termination leaves a feather edge, and a feather edge lifts.
4. The sealant joint where most projects fail
All movement in a cove detail is concentrated into a 6-10 mm band at the head of the cove. The joint moves and the cove below it does not, so the bead across that band takes the whole differential, which is why the sealant is the weakest element and the one most often chosen by habit.
Specify a food grade sealant of polyurethane or neutral-cure silicone, hardness around Shore A 25-35, resistant to mold, and backed by a migration or suitability statement for food contact. The choice is made for the chemicals in the room, not for the color. Standard sanitary silicone is the wrong choice where fats and hot water are present, because it loses adhesion at the flanks.
Geometry matters as much as chemistry, and it is the part of hygienic detailing that gets drawn last. A joint that is too deep cannot be tooled; one that is too shallow cannot stretch. The rule is a depth between half and equal to the width. A 6 mm bead is therefore 3 mm to 6 mm deep, held by a closed-cell backer rod and tooled once with a lubricated spatula so it finishes concave.
Sequence decides the outcome. Clean both flanks, confirm they are dry, apply primer where the substrate needs one, insert the backer rod, gun the sealant, tool it, then leave it alone. Sealant applied over dust or a damp flank looks correct on the day and fails at the first washdown.
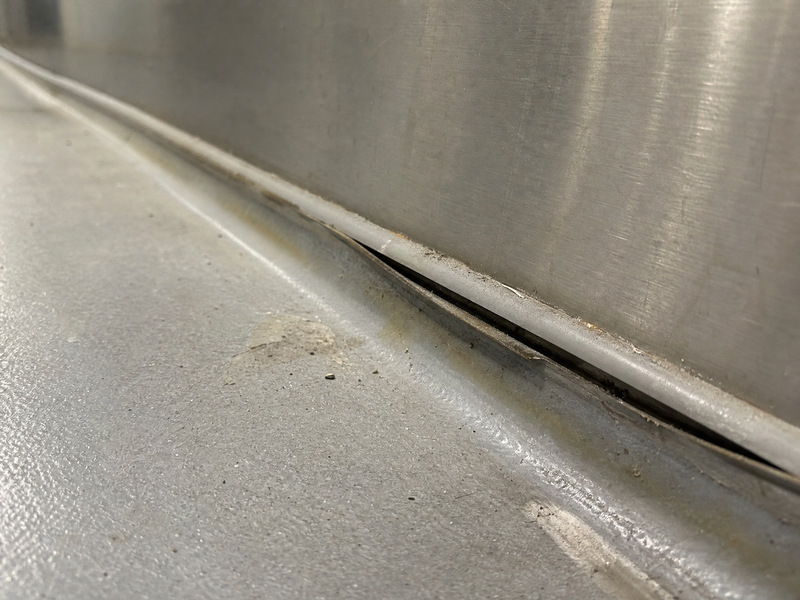
Figure 2. A failed head joint at a stainless plinth: the bead has peeled from one flank, the gap is open to water, and soil sits in the shadow line that coving was meant to remove.
Hygienic detailing fails at interfaces, and the cove head is the interface most often shared. A coved skirting resin floor is only as good as this joint, and the joint is the item most often left to the applicator’s habit. Two suppliers on one detail means two parties explaining why the bead opened, and the plant owns the repair.
5. Washdown areas versus cold rooms
A washdown room and a cold room pull the same detail in opposite directions, so one specification rarely covers both. A coved skirting resin floor in each zone answers its own movement problem, and sanitary design has to hold both answers in one drawing set.
A washdown area sees 50-60 °C water at the nozzle and steam at 100-120 °C at the surface. It also sees caustic at 1-3% NaOH and 70-80 °C, peracetic acid at 0.1-0.5% and hypochlorite at 100-200 ppm free chlorine. The sealant has to hold adhesion through that cycle several times a day, and the cove has to resist the same chemistry.
Thermal shock is a rate problem, not a temperature problem. Hot rinse on a cold slab builds the damaging gradient in seconds, and the cove base is where the gradient is steepest because two planes meet there. That is why a coved skirting resin floor with a rigid epoxy cove cracks at the base in a room washed with hot water.
In cold room flooring the joint moves with temperature instead. A rigid epoxy cove at -25 °C cracks at the base, because floor and wall contract at different rates and the cove has no give. Use a flexible PU cove or a preformed strip, and keep the sealant inside its stated movement class.
In a freezer the cove and the sealant share the movement duty, which is why cold room flooring usually pairs a flexible cove with a low-modulus bead. If both are rigid, the movement goes into the weakest plane, which is the base of the fillet.
Table 3. Sealant selection by area and temperature
| Area | Service condition at the joint | Sealant type | Hårdhet | Notera |
|---|---|---|---|---|
| Dry store and packing | 15-25 °C, no standing water | Neutral-cure silicone | Shore A 25-30 | Lowest movement demand |
| Wet process washdown | 50-60 °C water, steam to 100-120 °C | Food grade polyurethane | Shore A 30-35 | Food grade sealant holds bond under hot rinse |
| High-care chemical CIP | Caustic 1-3% NaOH at 70-80 °C | Food grade polyurethane | Shore A 30-35 | Ask for a chemical resistance statement |
| Cold room | -25 °C to +20 °C across the year | Low-modulus polyurethane | Shore A 25-30 | Movement class must span the range |
| Door frame and plinth | Ambient, coated steel or concrete | Neutral-cure silicone | Shore A 25-30 | Primer needed on painted surfaces |
Read the table as a starting point, not a specification. Every food grade sealant in it is matched to the cleaning chemicals the plant actually buys, at the dilution and temperature the crew uses. After that, the cold room flooring row changes as soon as the room is washed with warm water.
6. What an auditor looks for at the floor-to-wall junction
At the floor wall junction an audit is a record of five visible points, not a hygiene measurement. Each point asks whether the detail can be cleaned, and hygienic detailing is what turns a cleanable surface into a cleanable room.
Sanitary design is judged at the junction, not in the middle of the floor. The auditor records whether the coved skirting resin floor can be cleaned with the tools on site, and five things are written down:
- Continuity: the cove runs without a break around the room and through every change of direction.
- Coving radius: the arc is the stated size and constant along its length.
- Gaps: none at the base, none at the head.
- Food grade sealant: the bead is intact, bonded on both flanks and not discolored.
- Cleanability: the surface can be cleaned by hand with the tools the plant owns, without a scraper.
The hollow sound test is the first screening step on any junction. Tap along the cove with a coin or the handle of a screwdriver. A hollow note means the fillet or the strip has debonded, and a debonded cove holds water behind it. Mark each hollow point and photograph it with a location tag.
Audit checklists and hygienic design guidance generally ask for at least 50 mm of coving radius, with 75-100 mm preferred in high-care. If your drawing says 50 mm and the room is cleaned with a ride-on machine, the drawing is the problem, not the cleaning crew.
7. Detailing around doors, plinths and drains
Terminations matter more than the cove itself, because a resin coving run breaks at a door frame or a plinth, not in the open field. Four conditions account for most of the failures we see: door frames, plinths and equipment bases, penetrations, drains.
Door frames. Run the cove to within 20-30 mm of the frame, then close the gap with sealant rather than mortar. Mortar packed against a steel frame cracks as the frame moves, and the crack opens at floor level where it holds water.
Plinths and equipment bases. Either carry the cove up and over the plinth so the base sits inside the wet zone, or stop at the plinth face and form a sealant fillet at its foot. Choose one on the drawing and do not leave the choice to the crew.
Pipe penetrations. Sleeve the pipe, fill the annulus, then bring the cove and the floor coating up the sleeve to a height above the wet line. A penetration sealed flat at floor level is the first place an inspector will find a gap.
Drain surrounds. The cove must run continuously into the drain flange, with the flange clamping the coating. General drainage fall is 1:80 to 1:100, about 1.0-1.25% across the floor, and local wet zones may go to 2%. A drain standing 3 mm low with the cove stopping 20 mm short leaves a ring of water that nothing reaches.
Each condition belongs on the drawing as a numbered detail, because hygienic detailing is decided by what the crew can see at the set-out. A coved skirting resin floor is only continuous where the drawing says it is.
8. Specifying coving so it can be inspected
A clause that reads “provide coved skirting to all walls” cannot be priced, inspected or disputed. Write numbers instead.
State four numbers in the clause: the radius by area, the cove height, the build-up type and the sealant family. Say whether the resin coving is monolithic or a bonded strip. State the substrate preparation: mechanical grinding, priming of both planes, and a moisture check before the fillet goes down. State the acceptance criteria at the floor wall junction in the language the auditor will use.
A workable clause reads: “Provide a monolithic fillet at 50 mm radius in wet process and 75-100 mm in high-care, terminating on a level line 150 mm above the floor, sealed with food grade polyurethane.”
Add hold points. A one-meter mock-up of the junction, built before the main body coat and accepted in writing, settles most arguments about radius and termination. It is the sanitary design check that costs one meter of material instead of a room. Photograph it and keep the photograph as the reference for the rest of the building.
Ask for an as-built junction schedule. Every door, plinth, penetration and drain, numbered, with the detail used and the sealant batch. That schedule is what the auditor will ask for, and it is what the next contractor needs when the plant is extended.
Good sanitary design at this scale is a set of numbers, a sequence and a drawing that a crew can follow without interpretation.
Frequently asked questions
What is the minimum cove radius for a food plant floor?
Fifty millimeters is the minimum an inspector will test the arc against in a washdown area. Go to 75 mm or 100 mm when the coving radius has to carry a machine head, because a scrubber cannot tilt into a tight corner.
Should the cove be part of the floor build or a separate strip?
In a wet room, a coved skirting resin floor is one film from the field up the wall, so no adhesive line sits in the wash zone. A preformed strip suits cold rooms and retrofits, where a short shutdown leaves no set window for resin coving.
What sealant belongs at the head of a cove?
A food grade sealant here is polyurethane or neutral-cure silicone, Shore A 25-35, with a written food-contact suitability or migration statement. Ask for that statement rather than a data sheet headline: a standard sanitary grade is the wrong compound for fats and hot water, and debonds at the flanks.
How high should a cove run up the wall?
100-150 mm above finished floor level is the usual band. The head finishes above the wet line and below the wall’s own coating, so the top of the cove is a drawn, level line rather than the point where the trowel ran out of material.
Why does a cove crack at the base in a cold room?
In cold room flooring the slab and the wall move by different amounts, so the base of the cove takes the whole difference. A rigid epoxy cove has no give and cracks there at -25 °C. Specify flexible PU, or a preformed strip on a retrofit, with a sealant rated for that movement.
Can a sealant bead replace a cove in a dry area?
Only where the room is never hosed. A tooled bead has no backing and no bond width, so the arc it holds is unsupported and it opens at the flank within a season. Where the room is washed, specify a fillet or a strip and keep the bead for the head joint.
How do you test a cove without laboratory equipment?
A cove can be screened in three steps: tap it, look at the head joint under grazing light, and run a hand along the arc. A hollow sound means the bond has failed; a constant arc and a closed head joint pass.
Why food plants work with Kaida Paint
Kaida Paint formulates and manufactures epoxy, polyurethane, cementitious urethane and MMA systems for food and beverage plants, commercial kitchens and cold stores. A coved skirting resin floor is supplied as part of one build rather than as an accessory.
- Primer, body coat, broadcast, topcoat, coving and sealant come from one formulation family, so responsibility for a junction failure is not split between suppliers.
- Technical data sheets state thickness limits, temperature windows, pot life and chemical resistance ranges, and we decline work outside those limits rather than adjust the data sheet.
- We support specification: moisture and adhesion test planning, system selection by zone, junction details drawn for the room, and application guidance for the crew.
- We also produce private-label and OEM material for distributors, with batch records and certificates of analysis per lot.
Send your plant’s zone list, the cleaning chemicals and the nozzle temperatures, and we will return a system recommendation and a junction detail for each area, as drawings in DWG and PDF.









 English
 Spanish
 Portuguese
 Arabic
 French
 Italian
 Russian
 Indonesian
 Swedish