An expansion joint resin floor is designed to move, and a joint that is left out does not stop the movement, it just decides where the crack appears. That is the whole argument for spending money on joints.
Three kinds are common in food plants: saw cuts that control shrinkage, movement joints that follow the structure, and transitions between areas or materials. Each has a different job and a different detail.
This article covers all three, the width and filler that make them work, the armoured versions for traffic, and how to record them so the next trade does not drill through one.
Why a resin floor needs joints
For an expansion joint resin floor, the structural drawing comes before the resin. Concrete moves with moisture, temperature and load, and a rigid resin film bonded to it moves with the concrete until the stress exceeds the bond or the film’s strength. A joint gives the movement somewhere to go.
A floor without joints does not stay joint-free; it cracks. The crack appears where the slab is weakest, which is usually a corner, a drain or the middle of an aisle, and it is never where you would have chosen.
An expansion joint resin floor therefore begins with the structural drawing rather than the resin. The joints in the slab are the joints in the floor, and the flooring specification should follow them rather than invent a grid.
That is the first thing to check in a tender: does the scope include the joints, or does it assume the concrete contractor dealt with them? The gap between those two assumptions is where most joint failures start.
An expansion joint resin floor is only as good as its joint plan, and the plan costs nothing at tender. A joint is cheap when it is planned and expensive when it is cut into a finished floor. The cost difference is roughly a factor of five, without counting the shutdown.
So the question is not whether to have joints, but where they go and who pays for them. Both answers belong in the specification.
Saw cuts: what they do and do not do
A saw cut joint filling is a controlled crack. The cut is made early, usually within 24 hours of the pour, to a depth of about a quarter of the slab thickness, and it gives the shrinkage crack a line to follow.
A saw cut joint filling is a small job with a large consequence if it is skipped. In a resin floor, the saw cut has to be filled before the resin is laid, and the fill has to be compatible with the resin and able to take movement. A cut filled with rigid grout will crack again in the same place.
For expansion joint resin floor work, that is the failure to design out. The common failure is a saw cut that is filled flush and coated over. The resin bridges the joint, the joint moves, and the resin cracks along the line within a season.
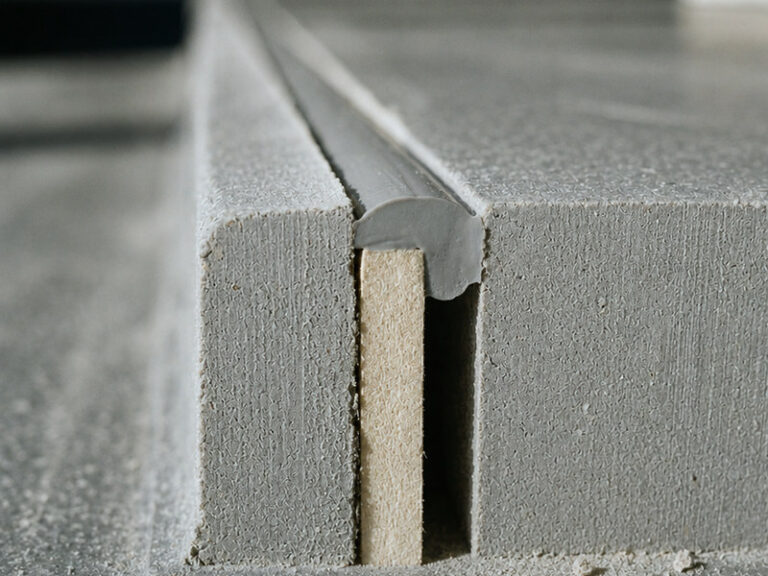
The correct detail keeps the joint open through the resin, with a compressed rod and a joint sealant at the surface. The resin stops at each side and the joint becomes a visible, maintainable line.
A saw cut joint filling schedule should also say who fills and who seals, because that is where the scope usually divides. Saw cuts are not a substitute for structural joints. They control shrinkage, not building movement, and a slab that needs a movement joint will still need one after the saw cuts are filled.
Record the cut locations on the as-built drawing. A saw cut that is filled and forgotten is a line that a later trade will drill through.
Movement joints and the structure
A movement joint floor follows the building: a structural joint, a change of slab, a wall line or a column grid. It accommodates movement that the slab cannot resist, and it must remain able to move after the floor is laid.
A movement joint floor is a building detail that the floor has to respect. That means the resin cannot bridge it. The joint is formed with a compressible filler, sealed at the surface, and detailed so that the sealant takes the movement rather than the film.
The width matters. A joint width of 10 to 20 mm is typical for a structural joint in a food plant. The sealant has to be rated for the movement the joint will see, which is often more than the floor’s thermal range.
Where a movement joint crosses a washdown area, the sealant becomes a hygiene item as well as a structural one. It has to be cleanable, and it has to be replaceable without closing the room for a week.
A movement joint that is sealed with a rigid material is worse than no joint, because it transfers the movement into the surrounding floor and cracks it in several places.
Detail the joint at 1:5 with the filler, the rod and the sealant shown, and put the drawing in the submittal. Movement joints that are described rather than drawn are usually built wrong.
Transitions between areas and materials
A floor transition detail happens where two floors meet: a resin floor and a tiled room, a wet area and a dry store, a production hall and a cold room. Each side moves differently and each side has its own cleaning regime.
The transition should be a joint, not a butt joint. Two resins meeting edge to edge will crack at the interface, and a resin meeting tile will crack at the grout line.
A stainless threshold is the usual answer where traffic crosses and water flows. It gives a mechanical edge to both sides, a sealant joint at each interface, and a cleanable surface in between.
Each expansion joint resin floor has its own transition problem, and the temperature one is the least obvious. Where the transition is between temperatures, the joint has to accommodate a larger range. A floor transition detail at a cold room door is a different detail from one at a dry store door, even though they look similar on a plan.
A floor transition detail that is drawn in plan will not show where the water goes. Draw the transition in section with both floors, the threshold and the two sealant joints. A plan view will not show where the water goes.
Where a threshold cannot be used, the fall has to be arranged so that water does not run towards the joint. A joint sealant that is permanently wet will fail regardless of the product.
The joint itself: width, filler and sealant
A joint width is set by the movement it has to take, not by what looks neat. The rod sets the depth of the joint, and it is the detail most often left out. A joint that is too narrow cannot accommodate the movement, and a joint that is too wide is difficult to seal and easy to damage.
The depth should be about half the width, with a backer rod to set it and to stop three-sided adhesion. A sealant bonded on three sides has nowhere to move and will tear at the bond line.
The joint sealant should be rated for the movement class of the joint and for the chemistry of the room. A joint in a caustic washdown area needs a different product from one in a dry store, even at the same width.
Profile matters as much as product. A concave bead sheds water and resists damage; a flat or proud bead collects soil and gets kicked by trolleys.
In a high-care room, the joint should be inspectable and replaceable without lifting equipment. That may mean routing the joint away from a plinth rather than through it.
Keep the joint details with the floor drawings and record the products used, so a replacement can match. A joint that cannot be matched will be replaced with something incompatible.
Armoured joints for heavy traffic
An armoured joint is a metal-edged joint that takes wheel loads and protects the sealant from abrasion. It is used at doorways, in aisles with pallet trucks, and anywhere the joint crosses a traffic route.
A movement joint floor with armour still needs the compressible filler beneath it. The armour has to be anchored to both sides of the joint, not one. A plate fixed to one slab and sliding on the other is a detail; a plate fixed to both is a crack waiting to happen.
Stainless is the usual material in a washdown area, and the fixings should be countersunk and sealed. A screw head in a food area is a foreign body risk and a corrosion point.
The armoured joint still needs a sealant and a filler beneath. The metal takes the load; the sealant keeps the water out, and neither does the other’s job.
Where an armoured joint is used at a threshold, it can double as the transition detail. That is often the cheapest way to solve both problems with one item.
Check the load class against the traffic. A joint rated for foot traffic in a forklift aisle will deform, and the deformation will open the sealant.
Crack inducement versus joint
Crack inducement is the practice of creating a weak line so a crack forms there rather than elsewhere. It is what a saw cut does, and it is sometimes proposed as a substitute for a movement joint, which it is not.
Inducement controls shrinkage cracking in a slab. It does not accommodate structural movement, and it does not replace a joint that the building needs.
In a resin floor, an induced crack that is not filled and sealed becomes a random crack with a resin film over it. The film cracks first, then water enters, and the repair is a joint anyway.
Where inducement is used, it should be detailed as a joint from the start: filled, sealed and recorded. The distinction between a saw cut and a joint is a matter of detail, not of intention.
Ask the structural engineer which lines are joints and which are inducement, and specify them differently. Treating them the same is how a floor ends up with cracks in the wrong places.
A plan that shows both, with a note on each, is worth more than a specification clause that mentions joints in general.
Specifying and recording joints
The joint plan is the part of a expansion joint resin floor specification that contractors actually build from. A specification should list the joints by type, location and dimension, with a drawing for each type. Three drawings, one schedule and a note on who fills what.
It should also state the sequence: saw cuts filled before the resin, movement joints formed with the resin, transitions built as the two floors meet.
Require the joint sealant and the backer rod to be named, with the movement class. A joint schedule without products is a drawing exercise, not a specification.
Record the as-built joint locations, with photographs, in the handover file. That record is what stops a later trade drilling through a movement joint to fix a pipe bracket.
Include joints in the maintenance schedule, with a replacement interval and an inspection frequency. A expansion joint resin floor that is never inspected is a joint that fails quietly.
A floor transition detail that survives ten years is usually the one that was priced separately. Finally, price the joints as line items. Items that are not priced are items that are not built, and joints are the first thing to disappear from a tight programme.
Table 1: Joint types and what each one does.
| Tipo | Scopo | Typical width |
|---|---|---|
| Saw cut | Shrinkage control | 3 to 5 mm |
| Movement joint | Structural movement | 10 to 20 mm |
| Transition | Material or temperature change | 10 to 15 mm |
Table 2: What goes under the sealant.
| Element | Function |
|---|---|
| Compressible filler | Takes movement |
| Compressible rod | Sets depth, breaks bond |
| Sealant | Keeps water out |
| Armour | Takes wheel load |
Table 3: Failures and their usual cause.
| Failure | Cause |
|---|---|
| Resin cracked over a cut | Joint bridged |
| Sealant torn | No backer rod |
| Joint edges broken | No armour |
| Crack beside the joint | Rigid fill |

Figure 1: Filler, backer rod, sealant. Three materials with three different jobs.
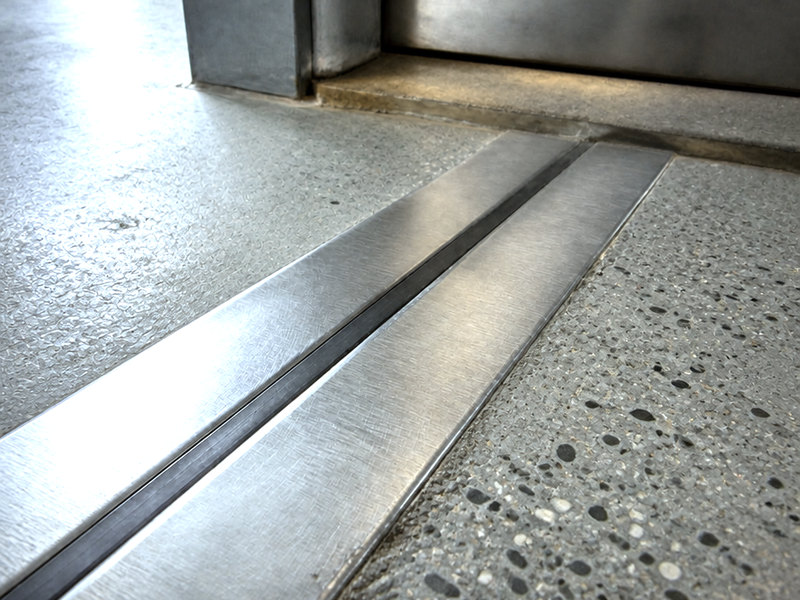
Figure 2: An armoured joint at a threshold solves the load and the transition in one item.
Frequently asked questions
Does a resin floor need expansion joints?
It needs the joints the slab needs. A resin floor follows the structural joints, and it also needs the saw cuts filled and sealed. A floor that omits them cracks where the slab decides, usually at a corner or a drain.
Can a saw cut be coated over?
No. If the resin bridges the cut, the movement cracks the film along the line within a season. The cut should be filled, sealed and left visible, with the resin stopping at each side.
What width should a movement joint be?
Ten to twenty millimetres is typical in a food plant, set by the movement the joint will see rather than by appearance. The sealant must be rated for that movement class.
Why is a backer rod necessary?
It sets the depth and prevents three-sided adhesion. A sealant bonded to the floor, the wall and the back of the joint has nowhere to move, so it tears at the bond line.
When do I need an armoured joint?
Where wheel loads cross the joint: doorways, aisles with pallet trucks, and any route used by forklifts. The armour takes the load and protects the sealant from abrasion.
What is crack inducement?
A weak line created so shrinkage cracks form there. It is what a saw cut does, and it does not replace a movement joint, which accommodates structural movement rather than shrinkage.
How do I stop a trade drilling through a joint?
Record the as-built joint locations with photographs in the handover file, and mark the joints on the floor plan that the maintenance team uses. Unrecorded joints get drilled.
Why food plants work with Kaida Paint
Kaida Paint details joints as part of the floor package, with drawings for saw cuts, movement joints and transitions, and the joint sealant named by movement class. We will also say which joints are structural and which are shrinkage control, because the two need different details. Send the structural drawing and the room schedule, and the reply includes a joint plan with the joint width marked.





 English
 Spanish
 Portuguese
 Arabic
 French
 Italian
 Russian
 Indonesian
 Swedish