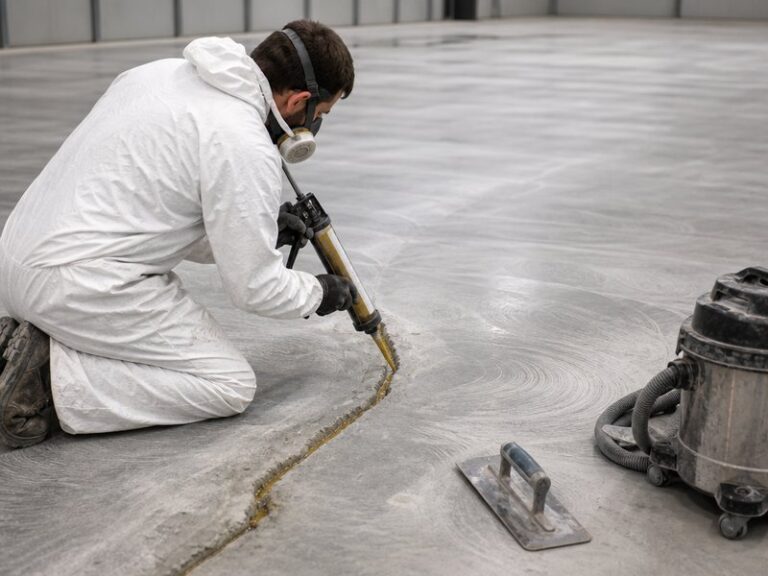
If you are asking whether you can apply epoxy over cracked concrete, the short answer is no — not until the cracks are repaired, cured, and ground flush. You repair cracks before epoxy by identifying the crack type and its movement, cleaning and routing the crack, filling it with the matched material (paste-grade epoxy crack filler — also called epoxy crack repair paste — for narrow dormant cracks, epoxy injection for deep ones, cementitious patch for spalls), letting it cure fully, and grinding the surface flat before coating. Skipping concrete crack repair is the most common reason an epoxy floor coating delaminates or blisters within the first year. This 7-step guide shows DIY homeowners, contractors, and facility managers how to do it, with cure times, 2025-2026 US cost data, and the mistakes that ruin coatings.
Cracks in concrete are not a cosmetic problem; they are a structural and chemical problem for any resinous coating. An epoxy film that bridges a moving crack will tear, a repair that is not fully cured will outgas through the fresh coating, and a patch that is not ground flush will show through as a hump. This guide covers the science behind each failure mode, the exact repair sequence we use on KAIDA PAINT projects (KAIDA PAINT is a resinous flooring systems manufacturer), and the budget and scheduling numbers you need.
Key Facts at a Glance
- Repair before coating: 24-72 hours for fillers, 3-7 days for deep cementitious patches.
- Active cracks take flexible polyurea or polyurethane; rigid epoxy suits only dormant cracks.
- Cracks get filled; control joints get sealed with a flexible joint sealant.
- Crack repair is typically 2-5% of a coating project and prevents most delamination failures.
- Coat only after ASTM F2170 RH readings fall below 85%.
1. Why Is Crack Repair Before Epoxy Coating Non-Negotiable?
An epoxy floor coating is a continuous film typically 0.3 to 3 mm thick. Concrete cracks are usually wider than the film itself, and many continue to move with temperature and moisture changes. When a coating is applied over an unrepaired crack, one of three things happens: the film tears along the crack line, the crack telegraphs through as a visible line or ridge, or air and moisture trapped in the crack outgas through the wet coating and leave pinholes and blisters.
The evidence is consistent. Failure-analysis studies published by AMPP (formerly NACE, ampp.org) attribute roughly 80% of premature coating failures to inadequate surface preparation and bonding, and an unrepaired crack is a preparation failure by definition. The American Concrete Institute’s guide ACI 224.1R, Causes, Evaluation, and Repair of Cracks in Concrete Structures (concrete.org), makes the same point from the concrete side: repair decisions must be based on crack cause and activity, not on cosmetics.
Our field records support this. In one 8,000 m² warehouse project, the contractor coated over a hairline shrinkage crack network without any repair. Within six months, the cracks had reflected through the epoxy floor coating, and forklift traffic turned the fault lines into peeling strips. The rework cost more than the entire repair scope would have cost on day one.
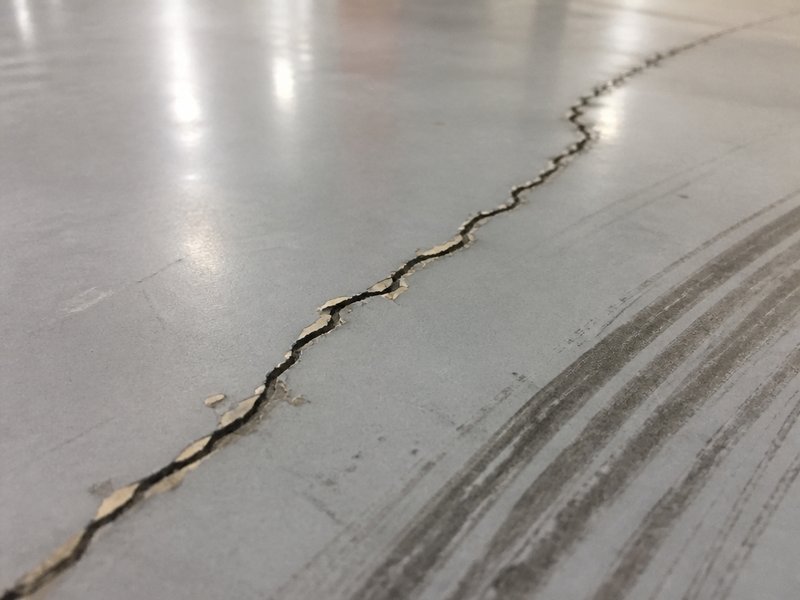
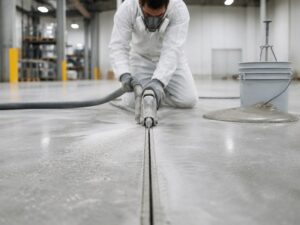
Figure 1. An unrepaired concrete crack reflects through the epoxy film within months. Repair and grinding must happen before the coating is applied.
2. How to Identify the Type of Concrete Crack You Are Dealing With
Before you touch a trowel, determine the crack type and whether it is still moving — those two facts, not crack width alone, decide the repair method.
Dormant vs. active cracks. A dormant crack has stopped moving; an active crack is still opening, closing, or lengthening. The standard check is a crack monitor: fix two reference points across the crack and measure the gap weekly for 30 to 90 days. If the width changes by more than roughly 0.25 mm, treat the crack as active.
Champ d'application : rigid epoxy repairs are limited to cracks that have stopped moving. For active cracks — those whose width changes by more than 0.25 mm over 30 to 90 days of monitoring — use a flexible polyurea or polyurethane system instead; a rigid filler will crack or debond when movement continues.
Crack types and their usual treatment:
Concrete crack types and the correct repair method before epoxy coating
| Crack type | Typical width | Movement | Repair method before epoxy |
|---|---|---|---|
| Hairline / map cracking | < 1.5 mm | Usually dormant | Paste-grade epoxy filler or thin epoxy flood coat |
| Drying shrinkage cracks | 1.5-6 mm | Dormant after 6-12 months | Route to U-shape, fill with epoxy mortar or semi-rigid polyurea |
| Plastic shrinkage cracks | 0.5-3 mm, shallow | Dormant | Grind, fill with paste-grade epoxy, re-profile |
| Settlement cracks | 3-12 mm | May be active | Low-viscosity injection if structural; flexible sealant if moving |
| Structural / overload cracks | Any, often > 3 mm | Evaluate by engineer | Structural evaluation first; low-viscosity injection per ASTM C881 |
| Spalling / potholes | Area defect | Dormant or active | Cementitious or epoxy mortar patch after edge removal |
| Expansion joint failures | Joint-width | Active by design | Flexible joint sealant only; rigid epoxy is for dormant cracks |
The honest rule: if the crack is structural, settlement-related, or wider than about 6 mm with visible displacement, involve a structural engineer before any concrete crack repair begins. Coating over a moving structural crack is a waste of material and money.
2.1 What Is the Difference Between a Concrete Crack and a Control Joint Before Epoxy?
A control joint is a designed, intentional gap cut into the slab to control where shrinkage cracking happens, and it moves by design. A crack is unintentional damage. The repair rule is opposite for each: cracks get filled, joints get sealed with a flexible material. Filling a control joint with rigid epoxy guarantees the joint will tear the coating the first time the slab moves, which is why control joint repair before epoxy is a separate decision from crack filling.
Control joint vs crack: how each is treated before epoxy coating
| Fonctionnalité | Crack | Control joint / expansion joint |
|---|---|---|
| Origin | Unintentional damage | Designed movement point |
| Movement | Dormant or active (test first) | Active by design, always |
| Repair before epoxy | Fill: epoxy paste, injection resin, or mortar | Flexible joint sealant only; rigid epoxy is for dormant cracks |
| If you coat over it | Repair first, or the crack reflects through the coating | Leave the joint functional; route and seal it with a flexible system |
The practical test: if the gap follows a straight, planned line — across the slab width or around a column — it is almost certainly a control or expansion joint; treat it as a joint. If it runs at an angle, branches, or appears without a pattern, it is a crack; treat it as a crack. To fill expansion joints before epoxy, use a flexible joint sealant only; an epoxy control joint filler is the wrong tool because rigid epoxy cannot survive joint movement.
3. What Tools and Materials Do You Need to Repair Cracks in Concrete?
A complete repair kit for a typical garage or warehouse floor is small and inexpensive. We list both the essentials and the optional upgrades so you can match the list to the job.
- Nettoyage : angle grinder with diamond cup wheel or crack-chasing wheel, stiff wire brush, industrial vacuum with HEPA filter, clean rags, solvent or degreaser for oil-contaminated cracks.
- Routing: crack router or grinder with V-shaped bit to open narrow cracks to 6-12 mm wide and 6-12 mm deep for better bonding and tool access.
- Filling: paste-grade epoxy cartridges and a caulk gun for narrow cracks; low-viscosity injection resin, injection ports, and surface sealer for deep cracks; polyurea or polyurethane semi-rigid filler for active cracks; cementitious or epoxy mortar for spalls.
- Finishing: putty knife or margin trowel, sanding block or hand grinder, backer rod for wide or deep voids.
- Testing: crack width gauge or crack monitor, moisture test kit (RH probes for ASTM F2170), pH test kit.
- La sécurité : respirator with organic vapor cartridges, safety glasses, nitrile gloves, knee pads.
Coverage rule of thumb: one standard 10 oz epoxy repair cartridge fills roughly 10 to 20 linear feet of a 6 mm wide, 6 mm deep routed crack. Buy one extra cartridge per job; the last crack always takes more than expected.
4. How to Repair Cracks in Concrete Before Epoxy: Step-by-Step
This is the sequence we use on every KAIDA PAINT installation and the one our technical team recommends to contractors and DIY installers. Each step exists to remove a specific failure mode.
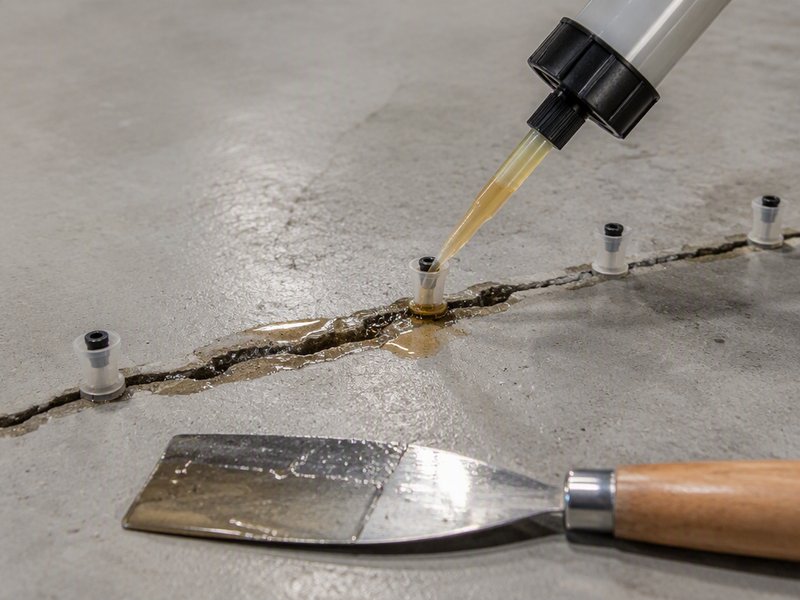
Figure 2. Low-viscosity injection resin is pumped from the lowest port upward until the crack refuses more material; the resin restores continuity across the crack.
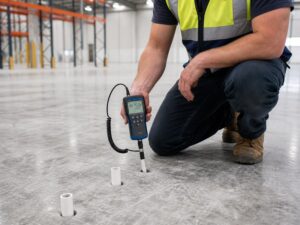
- Step 1: Evaluate and test the slab. Before repairing, run the moisture story. In-situ relative humidity testing per ASTM F2170 requires drilling to 40% of slab depth and equilibrating probes for at least 72 hours. Check surface pH with a test kit; new concrete can read pH 12-13. Record the crack widths and monitor active cracks for 30-90 days. A slab that fails moisture testing will fail the coating regardless of how well the cracks are repaired.
- Step 2: Clean and prepare the crack. Remove all loose material, dust, laitance (the loose powdery film of fine particles that rises to the surface of fresh concrete), and oil. Use a crack-chasing wheel or grinder to route narrow cracks into a clean V or U shape. For oil-contaminated cracks, clean with a suitable degreaser and let the area dry completely. Vacuum the crack and the surrounding floor with a HEPA vacuum until no dust remains. The surface profile for the surrounding area should be ICRI (International Concrete Repair Institute, [icri.org](https://www.icri.org)) Concrete Surface Profile 2-3, which is what epoxy systems are designed to bond to.
- Step 3: Fill narrow cracks with paste-grade epoxy. For dormant cracks up to about 6 mm wide, apply the paste with a caulk gun, forcing it into the crack with the nozzle tip. Overfill slightly, then screed flush with a putty knife. Epoxy crack filler bonds chemically to concrete and cures rigid, which is exactly what dormant cracks need. For very fine hairline cracks, a low-viscosity epoxy can be flooded over the area and worked into the fissures with a squeegee before the primer coat.
- Step 4: Repair wide and deep cracks with epoxy injection. For cracks deeper than the surface layer, use low-viscosity injection resin per ASTM C881. Place injection ports along the crack, seal the surface with a fast-set epoxy, and inject resin from the lowest port upward until the crack refuses more material. This restores continuity across the crack and is the method ACI 224.1R recommends for structural repairs. After the resin cures, grind the ports and surface sealer flush.
- Step 5: Patch spalls and potholes. Remove all unsound concrete until sound substrate is exposed, feather the edges, and patch with a cementitious repair mortar or epoxy mortar, depending on depth and exposure. Deep patches should be built in layers to control shrinkage and heat. This is concrete patching at its most demanding: a spalling concrete repair done this way is the only kind that will stay put under forklift traffic.
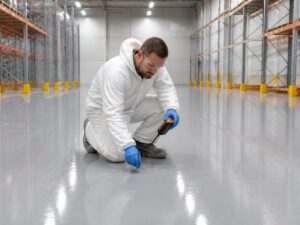
- Step 6: Grind flush and inspect. After fillers cure, grind the entire floor to a uniform CSP 2-3 profile, including the repaired areas. Any high spot in a repair will show through a self-leveling epoxy as a visible hump, and any low spot will trap air. Vacuum again, then inspect under raking light.
- Step 7: Cure, then moisture-test before coating. Wait for the full cure time — typically 24-72 hours for epoxy fillers and 3-7 days for deep cementitious patches at 23°C (73°F) — then re-run the ASTM F2170 moisture test before the epoxy floor coating is applied. In our laboratory and field testing at KAIDA PAINT, floors that passed this sequence consistently achieve pull-off adhesion above 1.5 MPa per ASTM D4541, while floors coated over fresh or incomplete repairs frequently fail below 0.5 MPa at the repair interface.
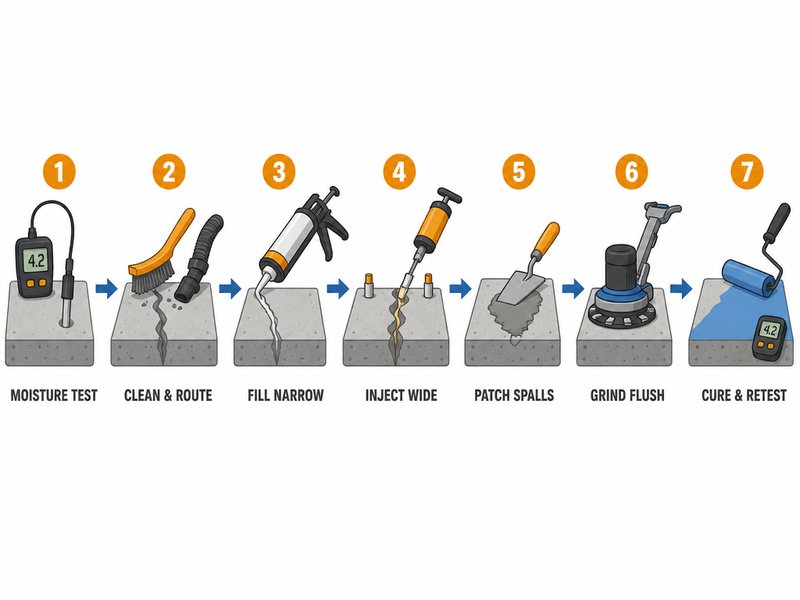
Figure 3. The 7-step concrete crack repair workflow before epoxy: evaluate and test, clean and route, fill, inject, patch, grind flush, and cure.
5. Epoxy Crack Repair Materials Compared
Not every crack needs epoxy, and not every epoxy is the right one. The best concrete crack filler for one slab can be the wrong choice for the next. Match the material to the crack’s width and movement, and match the cure time to your schedule.
Repair material comparison for concrete cracks before epoxy coating
| Matériau | Meilleur pour | Width range | Movement tolerance | Cure before coating |
|---|---|---|---|---|
| Epoxy crack filler (paste) | Narrow dormant cracks, hairline cracks | Up to 6 mm | Rigid; dormant only | 24-48 hours at 23°C (73°F) |
| Epoxy injection resin (ASTM C881) | Deep, structural, or settlement cracks | Any, full-depth | Rigid; dormant after stabilization | 48-72 hours, full strength 7 days |
| Polyurea / polyurethane semi-rigid | Active or moving cracks, control joints | 3-12 mm | Flexible; moves with the crack | 24 heures |
| Cementitious repair mortar | Spalls, potholes, deep patches | Area repairs | Rigid; requires sound edges | 3-7 days depending on depth |
| Flexible joint sealant | Expansion and control joints | Joint-width | Fully flexible by design | 24-72 heures |
How to read the table: width and movement come first, schedule second. A dormant hairline crack takes a 30-minute epoxy repair application. An active settlement crack takes monitoring, a flexible or injected repair, and honest scheduling. Trying to shortcut the movement question is where most epoxy crack repair jobs fail.
6. How Long After Concrete Crack Repair Can You Apply Epoxy?
The short answer: after the repair reaches its stated cure time and the slab passes a moisture test — typically 24 to 72 hours for most fillers and 3 to 7 days for deep patches. If your garage floor has hairline cracks and you want to epoxy it this weekend, the honest answer is to wait: coating over a fresh repair lets trapped moisture outgas through the epoxy film and blister it within days. Most epoxy crack repair products publish a cure table in their technical data sheet; follow it, because temperature changes everything. The long answer depends on the material, the repair depth, and the temperature.
Typical cure times before applying epoxy after crack repair
| Repair type | Tack-free | Ready for grinding | Ready for epoxy coating |
|---|---|---|---|
| Paste-grade epoxy filler | 4-8 hours | 12-24 heures | 24-48 hours |
| Low-viscosity injection resin | 12-24 heures | 24-48 hours | 48-72 hours (full strength 7 days) |
| Polyurea semi-rigid | 1-2 hours | 6-12 hours | 24 heures |
| Cementitious mortar patch | 2-4 hours | 24-48 hours | 3-7 days (depth-dependent) |
Two practical warnings. First, cure time is measured at roughly 23°C (73°F); every 10°C (18°F) drop roughly doubles the cure time, and cold slabs in winter can delay coating by a week. Second, “cured” does not mean “dry enough.” A repair can be hard to the touch and still release moisture into the coating. When you can coat: only after the repair cures and the ASTM F2170 RH readings fall within the coating system’s specification, typically below 85% RH.
Cold-weather rule of thumb: if you need to repair concrete cracks in cold weather, check the product’s minimum temperature before mixing. Most epoxy fillers and injection resins require a substrate and air temperature of at least 10°C (50°F); below that, cure slows or stops entirely. Polyurea and polyurethane fillers cure reliably down to about -7°C (20°F) with the correct primer, which is why they are the winter garage standard. So yes, you can fill concrete cracks in winter — provided you use a low-temperature system, or heat the space (or just the crack zone) and hold it above the minimum through the full cure window. A cold slab will not cure a repair, and an uncured repair will fail under the coating.
7. How Much Does Concrete Crack Repair Cost?
Cost is the question that decides whether projects happen at all, so here are the honest numbers. The ranges below reflect typical US market rates in 2025-2026 for materials and professional labor. As a rule, crack filling is priced per linear foot and concrete patching per square foot; your region and crack density will shift both.
Typical crack repair cost ranges before epoxy coating
| Repair method | Typical cost range | Notes |
|---|---|---|
| DIY epoxy repair cartridge | $15-40 per cartridge | Fills roughly 10-20 linear feet of routed crack; cheapest option |
| Routing and sealing (professional) | $3-10 per linear foot | Includes routing, cleaning, and filling |
| Epoxy injection (professional) | $10-30 per linear foot | For deep or structural cracks; includes ports and resin |
| Spall and pothole patching | $4-12 per square foot | Depends on depth and number of lifts |
| Surface grinding before coating | $0.75-2.50 per square foot | Required to level repairs and achieve CSP 2-3 |
The ROI math: a 100 linear foot crack repair scope at professional rates costs roughly 500to500to1,500. Recoating a failed epoxy floor costs 3to3to8 per square foot and usually means shutting down the space twice. On a typical garage or warehouse floor, concrete crack repair is between 2% and 5% of the total coating project, and it is the line item that protects every other dollar spent.
Worked example 1 — DIY garage floor (2-car, about 450 sq ft, 30 linear ft of cracks): three epoxy repair cartridges (45−120)+acrackrouterbit(45−120)+acrackrouterbit(20-40) + grinder rental (60−100)totalsroughly∗∗60−100)totalsroughly∗∗125-260**, plus 2-3 days of curing before coating.
Worked example 2 — Professional warehouse (10,000 sq ft, 200 linear ft of cracks plus spalls): routing and sealing 200 ft at 3−10/ft(3−10/ft(600-2,000) + spall patching 50 sq ft at 4−12/sqft(4−12/sqft(200-600) + grinding at 0.75−2.50/sqft(0.75−2.50/sqft(7,500-25,000) totals roughly $8,300-27,600, typically 2-5% of the total coating project. If you are a contractor bidding a warehouse repaint, quote crack repair as a separate line item with an acceptance test clause, so rework risk sits with the specification, not with your margin.
Cost basis: typical US market rates 2025-2026; HomeAdvisor national data (June 2026) lists crack sealing at 0.50−3perlinearfootwitha0.50−3perlinearfootwitha100-150 minimum service fee.
Get your repair-and-coat budget in 24 hours. Send us your floor area, crack photos or crack map, moisture readings if available, and traffic details — our specification engineers will recommend the complete repair-and-coat system with a coverage estimate and indicative pricing.
8. Common Concrete Crack Repair Mistakes to Avoid
These are the errors we see most often on sites, drawn from KAIDA PAINT installation records across 40+ countries.
- Coating over hairline cracks without repair. The crack reflects through the coating within months. A thin epoxy flood coat over the crack network costs little and prevents the entire failure.
- Rigid-filling an active crack. Epoxy crack filler is stiff; a moving crack will tear it or push it out. Monitor first, and use a flexible system for anything that moves.
- Patching over unsound concrete. Spalling concrete repair requires removing every loose fragment first; a patch laid over a hollow edge fails within months.
- Filling cracks in a wet or dirty crack. Epoxy bonds only to clean, dry, dust-free surfaces. Clean, vacuum, and fully dry the crack before any filler touches the concrete.
- Skipping the route. The correct method is to open a V- or U-shaped groove with a crack-chasing wheel first, so the filler locks mechanically inside the crack instead of sitting on the surface.
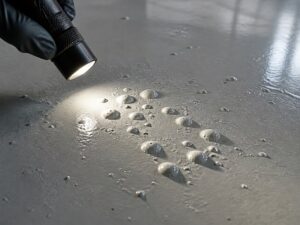
- Coating before the repair cures. Trapped solvent or moisture outgasses through the fresh epoxy film and creates blisters and pinholes.
- Leaving patches proud of the surface. Every high spot shows through a self-leveling system. Grind repairs flush before the primer coat.
- Treating every crack as structural. Most cracks are drying shrinkage and need a simple fill. Structural evaluation is for settlement, displacement, or overload cracks; guessing either way costs money.
Field example: in a food distribution facility, a crew filled hairline cracks with a water-based filler one morning and coated that afternoon. The next week, blister lines appeared exactly along the crack paths. The repair never cured enough, released moisture into the epoxy, and the affected bays had to be diamond-ground and recoated. The job took twice as long as the original schedule and cost more than the entire repair scope.
8.1 How Do You Verify a Crack Repair Is Ready for Epoxy Coating?
If you are a contractor quoting a 10,000 sq ft warehouse repaint, the checklist below is the difference between a clean close-out and a rework claim: it gives you a documented pass/fail for every repair, in writing. A repair is ready for coating only when it passes all four checks.
- Check 1 — Soundness: tap the repair and the surrounding slab with a steel rod or chain. A hollow ring means a hidden void or an unbonded patch; remove and redo that repair before coating.
- Check 2 — Surface profile: after grinding, the whole floor — including repaired areas — reads ICRI CSP 2-3. A patch left proud reads as a hump through a self-leveling system.
- Check 3 — Adhesion: pull-off adhesion per ASTM D4541 is above 1.5 MPa, our field pass threshold; failures at the repair interface typically read below 0.5 MPa.
- Check 4 — Moisture: ASTM F2170 RH readings are within the coating system’s specification, typically below 85% RH.
Run the checks in order and record the numbers. A documented acceptance test is also what makes a coating warranty enforceable: the manufacturer can only warrant a system installed over a substrate it can verify.
9. Concrete Crack Repair by Application
The same principles apply everywhere, but the priorities change with the environment and with who is doing the work.
For DIY homeowners: if you are coating a garage floor for the first time, the simplest crack repair you cannot skip is: route, clean, fill with paste-grade epoxy filler, cure 24-48 hours, grind flush, then coat. Budget $125-260 in materials and plan 2-3 days of curing before the coating weekend. In one of our project records, a homeowner repaired 30 linear feet of hairline and drying shrinkage cracks in a 2-car garage with three epoxy cartridges and a rented grinder on a Saturday; the coating applied the following weekend has shown no reflection after three years of use.
For contractors: when bidding a warehouse repaint, separate the bid into crack repair, joint treatment, and coating lines. Quote the cracks you classify as structural in a separate line, and attach the acceptance checklist to the scope so the pass/fail standard is agreed before work starts.
For facility managers: schedule the repair and coating in zones so production never stops. Fillers take 24-72 hours and deep patches 3-7 days to cure; stage the work bay by bay, and treat the moisture-test pass as the gate that releases each zone for coating.
Garage and residential floors. Expect drying shrinkage and hairline cracks on older slabs. The typical job is: route, fill with paste-grade epoxy, grind flush, prime, and coat. Concrete patching of small spalls usually happens in the same pass. A garage floor epoxy project is the most common use of this article’s workflow, and it is also where the cheapest shortcuts cause the most visible failures.
Basements and below-grade slabs. Moisture is the dominant risk. Test with ASTM F2170 before anything else. If your basement slab reads 90% RH, crack filler will not fix the moisture problem; no crack filler or primer can save a system installed over a wet slab. Specify a moisture mitigation layer or a breathable system instead — see our moisture and surface preparation guidance.
Commercial and warehouse floors. Cracks are wider and traffic is heavier. Low-viscosity injection for structural cracks, epoxy mortar for spalls, and full-depth joint treatment are the norm; spalling concrete repair there is a structural task, not a cosmetic one. Grinding to a uniform CSP 2-3 profile is non-negotiable under forklift loads.
Food and wet-process facilities. Cracks and joints are exposed to hot water, chemicals, and thermal shock. For these environments, a rigid epoxy repair under a flexible urethane cement system is the reliable specification; the complete guide to urethane cement flooring covers thermal-shock resistance, chemical resistance, thickness, and lifecycle cost in detail.
10. FAQ: Repairing Cracks in Concrete Before Epoxy
Q: Can you apply epoxy over cracked concrete? A : Not directly. An epoxy coating is a thin film that cannot bridge cracks, and cracks that still move will tear the coating. Repair, cure, and grind the cracks first; then the coating can be applied.
Q: What is the best crack filler for concrete before epoxy? A : For narrow dormant cracks, a paste-grade epoxy filler. For deep or structural cracks, low-viscosity injection per ASTM C881. For active or moving cracks, a flexible polyurea or polyurethane system. There is no single best material; the crack type decides.
Q: How long after concrete crack repair before epoxy coating? A : Typically 24-72 hours for epoxy fillers and 3-7 days for deep cementitious patches at 23°C (73°F). The repair must also pass a moisture test before coating; a hard surface is not the same as a dry slab.
Q: Can hairline cracks be coated over with just primer? A : A high-build epoxy primer flood coat can consolidate very fine hairline cracks, but wider cracks need a dedicated filler first. When in doubt, fill, because the primer is not a repair material.
Q: How do you fix cracks in concrete before epoxy on a garage floor? A : Route the cracks, clean and vacuum them, fill with epoxy paste, let it cure 24-48 hours, grind the whole floor flush to CSP 2-3, vacuum, then prime and coat.
Q: Does every crack need epoxy injection? A : No. Injection is for deep, structural, or settlement cracks where continuity across the crack matters. Surface cracks up to a few millimeters deep are correctly handled with a routed epoxy repair paste.
Q: My garage floor has hairline cracks and I want to epoxy it this weekend — can I just coat over them? A : Wait. Route and fill the cracks with paste-grade epoxy filler, let it cure 24-48 hours, grind the floor flush to ICRI CSP 2-3, and coat the following weekend. Coating over fresh repair lets trapped moisture blister the film within days.
Q: My basement slab reads 90% RH and has cracks — will crack filler fix the moisture problem? A : No. Crack filler repairs the crack; it does not remove moisture from the slab. Above roughly 85% RH, specify a moisture mitigation layer or a breathable coating system before any repair or coating work.
Q: How much does it cost to fix cracks in a 2-car garage floor before epoxy, and how long does the whole job take? A : Roughly $125-260 in materials and tools for a typical 2-car garage with about 30 linear feet of cracks, plus 2-3 days of cure time before coating. The repair itself takes one day; the cure time sets the schedule.
Q: Do I need to remove old paint or sealer before repairing concrete cracks? A : Yes, if the surface is painted or sealed. Epoxy bonds only to clean, bare concrete: grind or scarify the surface to strip paint, sealer, or curing compound, then clean and vacuum before routing and filling. Filling over a sealed surface produces a repair that peels together with the sealer.
Q: How long does a crack repair last? A : A correctly executed repair — routed, filled with the matched material, cured, and ground flush — lasts as long as the coating system above it, typically 15+ years on interior slabs. In our records, a garage-floor repair of 30 linear feet of cracks shows no reflection after three years. Re-inspect active cracks and joints once a year; dormant repairs need no maintenance.
Q: Should I fill control joints before epoxy coating? A : No — fill cracks, but seal control joints with a flexible joint sealant. A control joint moves by design, so rigid epoxy inside it will tear the coating at the first temperature change. Route and seal joints with a flexible system and keep them functional.
11. Final Recommendation
Concrete crack repair is not the glamorous part of an epoxy flooring project, but it is the part that decides whether the coating lasts 15 years or 15 months. Identify the crack type, monitor for movement, clean and route every crack, apply the right epoxy crack repair approach for its width, respect cure times, grind flush, and re-test moisture before coating. If you follow this sequence, the epoxy floor coating above it has every chance of reaching its full design life.
If you are planning a coating project and want the substrate science done correctly the first time, start with the slab assessment: crack mapping, moisture testing, and surface profile. Send us your floor area, crack photos or a crack map, moisture readings if available, and traffic details, and our specification engineers will recommend the complete repair-and-coat system within one business day.
About KAIDA PAINT and This Guide
PEINTURE KAIDA is a resinous flooring manufacturer with 15+ years of experience formulating and supplying epoxy, polyurethane, urethane cement, and MMA (methyl methacrylate) flooring systems for industrial, commercial, and healthcare projects in 40+ countries. Our range includes epoxy crack fillers, low-viscosity injection resins, solvent-free epoxy primers, self-leveling epoxy, high-build urethane cement, and ESD (electrostatic discharge) systems for static-sensitive production areas.
Why specifiers choose KAIDA PAINT for repair-and-coat projects:
- System-matched chemistry: our crack repair products, primers, and coatings are formulated in the same R&D program, so every layer bonds to the one below it without interface guesswork between brands.
- Tested, not assumed: repairs and systems are validated with ASTM D4541 pull-off adhesion testing, ASTM C881 resin compliance, and ISO 2812-1 chemical resistance testing in our laboratories.
- Technical specification support: our engineering team provides slab assessment guidance, crack evaluation checklists, moisture testing protocols, and CSI-compliant specification packages for projects of any size.
- Warranty with conditions you can meet: we warrant systems installed over documented, correctly repaired substrates, which keeps both sides accountable and honest.
Talk to a specification engineer: send us your project details, floor area, crack photos or crack map, moisture readings if available, traffic, and chemical exposure, and we will respond within 24 hours with a recommended repair-and-coat system, coverage estimate, and indicative pricing. Trusted by flooring contractors and facility teams in 40+ countries.


 English
 Spanish
 Portuguese
 Arabic
 French
 Italian
 Russian
 Indonesian
 Swedish