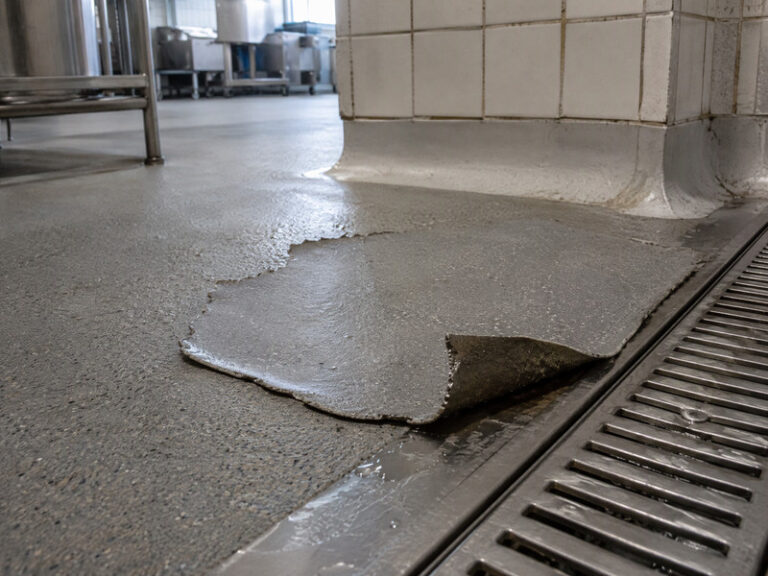
A resin floor failure almost always announces itself the same way: a patch that lifts, a surface that chalks, or a floor that has become slippery in the one place people walk most. The symptom is easy to see; the cause is one layer down.
Eight symptoms account for most failures we are called to: blistering, disbonding, pinholing, cracking, crazing, delamination, wear-through and slip loss. Each one narrows the cause to two or three possibilities, and a measurement closes it.
This map sets the eight symptoms against the eight causes behind them, gives the test that separates one cause from another, and ends with the repair that holds rather than the one that hides the problem for a season.
What a resin floor failure map is, and how to use it
A failure map is a decision table, not a catalogue of defects. You start with what you can see, move to what you can measure, and end with a repair scope that addresses the cause rather than the appearance.
Read it in one direction only. Symptoms are evidence; causes are hypotheses; measurements are the test. Repair comes last, because a repair applied to the wrong cause is a repeat visit with a warranty claim attached.
What usually arrives first is a resin floor failure described by its surface. That is the least useful information in the building. The useful information is at the bond line, in the substrate, and in the moisture history of the slab.
A single resin floor problem usually has a single cause, and it is rarely the resin. An epoxy floor failure on a slab that was never prepared is a preparation failure wearing a coating’s clothes.
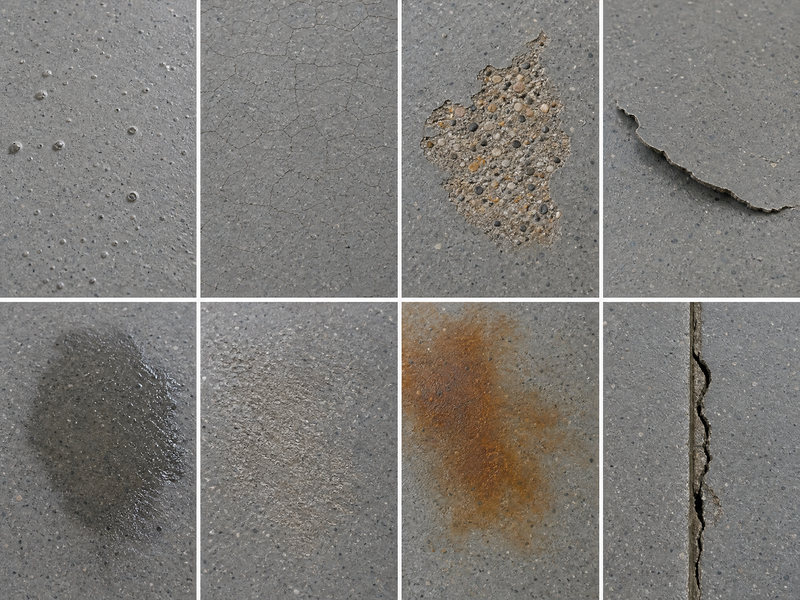
Figure 1: Eight symptoms, photographed at the same scale. Two look alike until you lift the edge.
Table 1: The map in one view. Read down from symptom to the two measurements that separate the likely causes.
| Symptom | Likely causes | Measurements |
|---|---|---|
| Blistering | Moisture, solvent retention, contamination | RH in slab, blister section |
| Disbonding | Preparation, contamination, primer mismatch | Pull-off, substrate inspection |
| Pinholing | Outgassing, porous substrate, application | Section, primer record |
| Rachaduras | Movement, thermal shock, slab cracks | Crack mapping, joint survey |
| Crazing | Thermal cycling, over-thick film, cure | Section, hardness |
| Delamination | Bond loss over an area, moisture | Tap test grid, pull-off |
| Wear-through | Abrasion, under-thickness, wrong system | Thickness, traffic survey |
| Slip loss | Buried profile, polishing, wrong class | Profile depth, ramp test |
Symptom 1 to 3: blistering, disbonding and pinholing
Blistering is a dome with a void under it. The void is either water vapour pushing up, solvent trying to leave, or air expanding under a film that cured too fast. Cut one open and the smell and the underside tell you which.
An osmotic blister has a specific signature: the void is liquid-filled, the underside is glossy, and the pattern follows the slab rather than the traffic. That is moisture vapour transmission arriving from below, not rain from above.
Disbonding is flat rather than domed. The film lifts cleanly and the substrate underneath is intact and often dusty, which points to substrate contamination or to a preparation step that was skipped.
Pinholing is small, uniform and everywhere. It is usually outgassing from a porous substrate or a primer that was not sealed before the body coat went down. A single pinhole is cosmetic; a field of them is a barrier problem.
Reports often lump the first two together as floor blistering delamination, and that is where repairs go wrong. Blistering and disbonding have different causes and different repairs, and treating one as the other is how a floor is patched twice in a year.
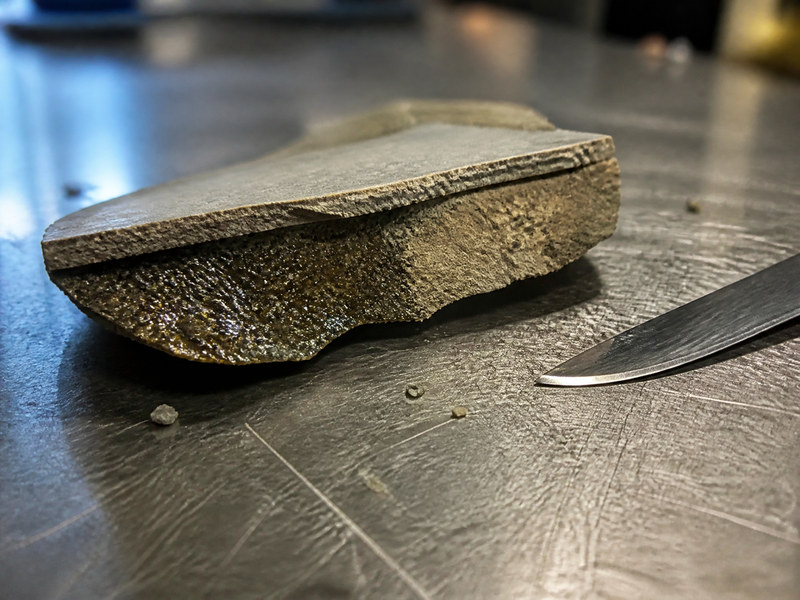
Figure 2: Cut a blister open. A glossy, wet underside points to moisture; a dry, dusty one points to contamination.
Symptom 4 to 6: cracking, crazing and delamination
Cracking runs deep and follows a line: a slab joint, a construction joint, a bay edge. It is movement expressed through a rigid film, and it widens and closes with temperature.
Crazing is a fine network, like dried mud, and it usually sits where the film is thickest or where thermal shock repeats. It is a cure and thermal signature rather than a structural one.
Coating disbondment over an area is the most serious of the three. A tap test on a grid shows how far it has spread, and the boundary between a hollow note and a solid one is the repair line.
The distinction matters for cost. Cracking at a joint is a detail repair with a flexible filler; coating disbondment across a room is a removal. Mistaking one for the other doubles the scope in the wrong direction.
When two of these symptoms appear in the same bay, a resin floor failure usually traces back to a system specified for the wrong movement class. A rigid system on a slab with live joints will crack no matter how well it was applied.
Repair sequencing follows the same logic. Where two symptoms overlap, repair the one that will spread: bond loss under traffic moves faster than a crack at a joint, and a wet core hides both until the floor is opened.
Symptom 7 and 8: wear-through and slip loss
Wear-through appears first on the traffic lanes, at doorways and where pallets turn. The aggregate becomes visible, then polished, then the body coat goes, and the floor starts to look patchy rather than worn.
Slip loss is the quieter one. The surface still looks intact, but the profile has been buried by too many topcoats or polished by rubber traffic, and the class has dropped without anyone noticing until an incident.
Wear-through and slip loss are both resin floor failure symptoms with a specification cause behind them. Wear-through usually means the build-up was thin for the traffic; slip loss usually means the aggregate was specified but the seal coat was too generous.
A profile gauge and a straightedge answer the first question quickly. If the profile depth is under about 0.2 mm, the surface is effectively smooth whatever the original specification said.
Neither symptom needs a full replacement in most plants. Both need the cause addressed, because a recoat over a polishing lane will polish again within two years in the same place.
The four causes that sit underneath almost every failure
Behind the eight symptoms sit four causes: moisture, contamination, movement and thinness. Almost every resin floor problem we investigate resolves into one of them, sometimes two.
Moisture arrives as moisture vapour transmission from the slab or as water trapped during application. It produces osmotic blister and, over time, coating disbondment. The test is a relative humidity probe in the slab, not a plastic sheet taped to the floor.
Substrate contamination is the second. Oil, fat, curing compounds, dust and old adhesive all sit between the resin and the concrete, and none of them are visible after the floor is down. A epoxy floor failure that lifts in sheets is usually this cause.
Movement is the third: live joints, thermal cycling, and slabs that were never designed to be monolithic. The fourth is thinness, which turns a normal traffic load into wear-through and a normal washdown into a bond failure.
Naming the cause is not academic. Each of the four has a different repair, and three of the four cannot be fixed from the surface.
Table 2: The four causes, the symptom each one produces, and the test that confirms it.
| Cause | Typical symptom | Confirming test |
|---|---|---|
| Humidade | Osmotic blister, disbonding | RH probe in slab, blister section |
| Contamination | Disbonding in sheets | Pull-off, substrate inspection |
| Movement | Cracking at joints, crazing | Crack mapping, joint survey |
| Thinness | Wear-through, slip loss | Thickness gauge, profile gauge |
Diagnosing with moisture, adhesion and thickness measurements
Three measurements resolve most cases. Relative humidity in the slab tells you whether moisture is the driver. Pull-off tells you whether the bond is intact. A thickness reading tells you whether the system is what the specification said.
Take the RH reading at depth, in holes sealed and equilibrated, at a rate of at least one per 100 m² and always at the failure. A surface reading with a meter pressed on the floor is not a moisture measurement.
Pull-off values below 1.5 MPa, or a failure inside the concrete, shift the diagnosis toward preparation and substrate contamination. A high value with a clean lift points instead to a primer or coating disbondment issue.
Plot the results on a plan rather than in a list. Floor blistering delamination that clusters around drains and doorways has a different cause from one that follows a slab joint, and the plan shows which pattern you have.
A thickness reading also settles arguments about what was installed. Two cores from the same bay, one at 0.4 mm and one at 1.2 mm, describe a floor applied unevenly rather than a floor that wore out evenly.
Where the floor is under production and cannot be opened up, a tap test grid plus two or three cores gives enough to write a scope. The cores also let you measure moisture vapour transmission effects at the bond line directly.
Repair routes: patch, overlay or full replacement
Three routes exist, and they follow the depth of the problem rather than the area affected. Pinholes, wear-through and isolated cracks are surface repairs. Disbonding over a bay is an overlay question. Bond loss across a room is a removal.
A patch repair works when the cause is local and has been removed. Cut back to sound material, grind the edges, prime, and rebuild the build-up. A patch that skips the edge preparation fails at the perimeter within a season.
A uretano cimentício overlay works when the existing bond is sound and the failure is in the wear course. It needs the same moisture check as a new floor, because an overlay over a damp slab reproduces the original epoxy floor failure with a new top coat.
The honest answer is replacement where coating disbondment covers more than about a third of the area or where contamination is general rather than local. In that case the patch repair route is a series of small jobs that never ends.
Table 3: Repair route by symptom and extent.
| Symptom and extent | Route | Watch for |
|---|---|---|
| Pinholes, isolated | Seal and recoat | Outgassing returns if primer is thin |
| Wear-through on lanes | Local overlay | Same thinness repeats |
| Crack at a joint | Detail repair with flexible filler | Rigid filler cracks again |
| Disbonding in one bay | Bay overlay after preparation | Moisture under the bay |
| Disbonding over a room | Full removal and rebuild | Programme and downtime |
Reading the map in the right order on site
On site, the order is: walk the floor, photograph and map, then measure. Walking tells you the pattern; measurement tells you the cause; the map tells the client what they are buying.
Photograph every symptom with a scale in frame, and mark it on a plan with a grid reference. A resin floor problem report without locations cannot be priced, and a contractor who cannot price it will pad the quote.
Take the measurements at the failures and at one control location that has not failed. The control is what turns a reading into a comparison, and the comparison is what supports the diagnosis.
Then write the scope in the same order as the map: symptom, cause, extent, repair, test. A client who can follow that sequence can also see why a patch repair is not adequate for a room-wide floor blistering delamination.
Finally, fix the flooring specification that allowed the failure. A repaired floor on an unchanged substrate contamination or moisture condition is a scheduled repeat, and the next report will use the same words.
Where the floor is being replaced rather than repaired, the new resin floor failure specification should carry the moisture limit, the preparation standard and the thickness that the failure just demonstrated were missing.
Frequently asked questions
What causes most resin floor failures?
Moisture and preparation, in that order. Moisture produces osmotic blistering and disbonding; poor preparation or substrate contamination produces flat disbonding. Resin chemistry is rarely the cause.
How do I tell blistering from disbonding?
Cut it open. A blister has a void, often liquid-filled, with a glossy underside. Disbonding is flat, and the substrate under it is dusty or contaminated. The repair differs, so the distinction matters.
Can a blistering floor be patched?
Locally, yes, if the moisture source is addressed. If the whole slab is above the system limit, patching is cosmetic and the next blister appears within a season. Test the slab before agreeing to a patch repair.
What pull-off value indicates a bond failure?
Below about 1.5 MPa, or a failure that occurs inside the concrete rather than at the bond line, indicates a preparation problem. Record the failure mode, not only the number.
Is wear-through a sign the resin was wrong?
Usually it is a sign the build-up was thin for the traffic. A 0.3 mm coating on a forklift lane wears through; a 1.5 mm broadcast system in the same place does not. Check thickness before blaming the product.
Why has my floor become slippery when nothing changed?
The profile has been buried or polished. Extra topcoats and rubber traffic both reduce profile depth, and the class drops without any visible damage. Measure the profile before specifying a remedy.
When is replacement cheaper than repair?
When bond loss covers more than roughly a third of the area, or when contamination is general rather than local. At that point the repair sequence becomes a rolling programme with no end date.
Why food plants work with Kaida Paint
Kaida Paint manufactures epoxy, polyurethane, cementitious urethane and MMA systems for food and beverage plants, and supplies them as finished systems or as OEM and private-label production for distributors. Each batch ships with a certificate of analysis and a batch record, and TDS and SDS documents are issued in the buyer’s language. When a plant sends photographs and a plan, our technical team will map the symptoms against the causes in this article and propose a repair scope with the moisture and adhesion tests written into it. A resin floor failure investigation then ends with a repair scope rather than an opinion, which is what a maintenance budget needs.
Send the photographs, the plan and any previous reports, and the reply is a symptom map marked up with the measurements still needed.





 English
 Spanish
 Portuguese
 Arabic
 French
 Italian
 Russian
 Indonesian
 Swedish