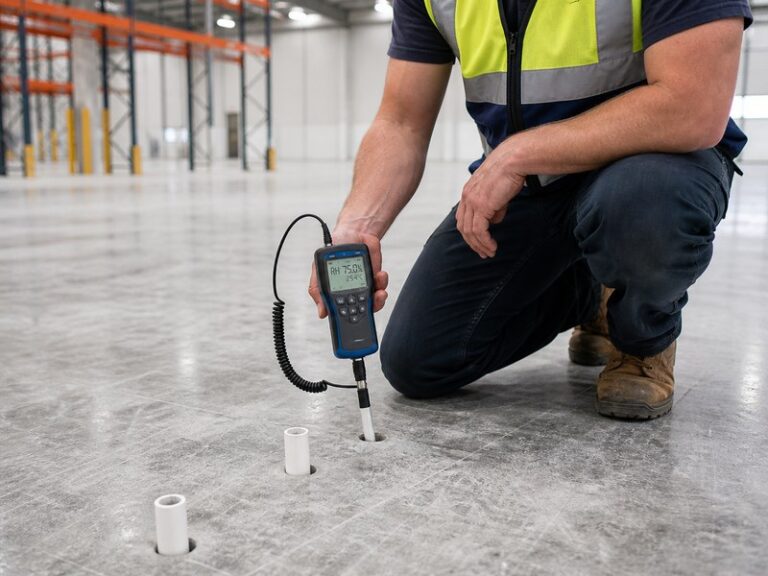
Moisture in concrete is the single most common cause of resinous flooring failure. When a slab’s internal relative humidity (RH) exceeds about 75%, or its moisture vapor emission rate (MVER) tops 3 lbs per 1,000 sq ft per 24 hours, trapped vapor pressure lifts epoxy and polyurethane films off the substrate – producing blistering, delamination, and efflorescence within months. This guide explains the failure mechanisms, the moisture limits you must meet before coating, and the four standard test methods (plastic sheet, calcium chloride, in-situ RH probe, and moisture meter), so you can verify any slab before installing a resinous floor.
Key moisture numbers for resinous flooring at a glance
| Metric | Значение | Where covered |
|---|---|---|
| Maximum RH for standard epoxy (ASTM F2170) | 75% | Section 4 |
| Maximum MVER for standard epoxy (ASTM F1869) | 3 lbs / 1,000 sq ft / 24 h (about 15 g/m²/24 h) | Section 4 |
| RH probe depth (single-face drying) | 40% of slab thickness | Section 7 |
| Minimum probe count | 3 probes + 1 per 1,000 sq ft | Section 7 |
| Drying time rule of thumb | 1 month per inch (25 mm) of slab thickness | Section 5 |
Resinous flooring is a sealed, impermeable system, and that is exactly why moisture is its greatest risk. We have tested slabs in warehouses that appeared bone-dry and measured internal relative humidity above 90% nine months after the pour. Below we cover the moisture sources, the failure physics, the pass/fail limits, step-by-step testing, and what to do when a slab fails – including moisture-tolerant primers, vapor barriers, and urethane cement systems.
1. How Does Moisture in Concrete Ruin a Resin Floor?
What is moisture in concrete?
It is the water held inside a cured slab: residual mix water left over from placement, groundwater drawn up through slabs on grade, and water from leaks or condensation. A slab can look dry on the surface while its interior stays above the safe limit for months – which is why the water inside the slab, not the look of its surface, determines whether a resinous floor can be installed.
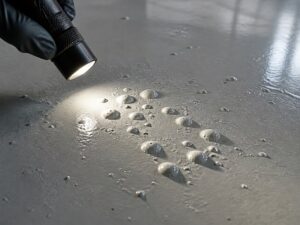
Moisture in concrete destroys resinous flooring through one physical mechanism: vapor pressure. Water inside the slab evaporates, and the rising vapor meets the impermeable resin film at the concrete-coating interface. Because the film cannot breathe, pressure accumulates beneath it until the coating is physically pushed off the substrate. Epoxy floor blistering is the most recognizable signature of this process, and most epoxy floor blistering causes trace back to vapor pressure at the interface.
Why it happens: A cured epoxy or polyurethane film has virtually zero water vapor permeability. Once installed, it acts as a one-way vapor barrier: it stops drying from above while ground moisture and residual mix water continue to migrate upward. The result is a pressure cell under the film that grows for weeks or months.
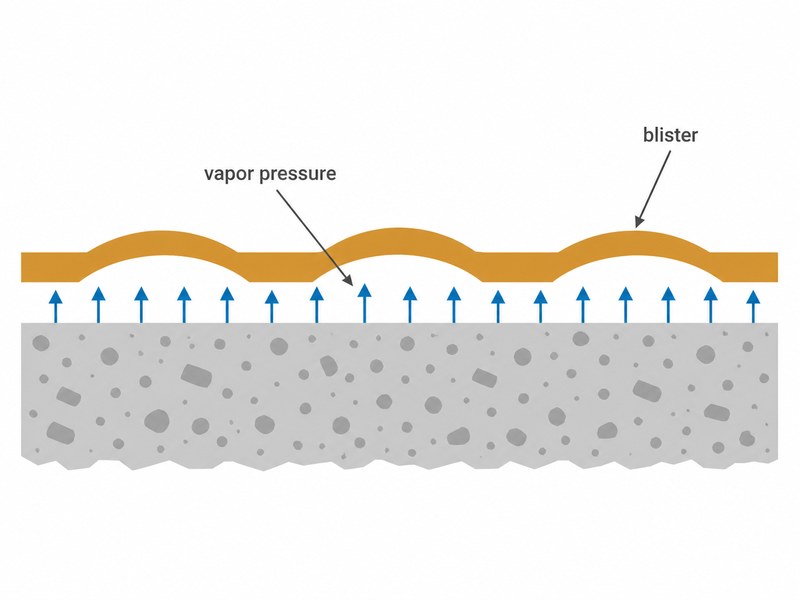
Figure 1. Osmotic blistering mechanism: vapor pressure from trapped slab moisture lifts the epoxy film into dome-shaped blisters.
The four failure modes we document in the field:
How moisture manifests as resinous flooring failure
| Failure mode | What you see | Mechanism |
|---|---|---|
| Osmotic blistering | Liquid-filled blisters that grow over weeks, often in clusters; the film lifts in domes 10-100 mm across. | Dissolved salts at the interface draw water through the concrete by osmosis; the salt solution swells and pushes the film upward. |
| Delamination / adhesion loss | Large sheets of coating peel away under traffic; bare concrete exposed beneath. | Vapor pressure exceeds the bond strength of the coating at the concrete interface. |
| Efflorescence and alkali attack | White, chalky salt deposits that bleed through the film or collect at joints and edges. | Soluble salts and calcium hydroxide are transported upward with the moisture and crystallize under or through the coating. |
| Pinholing and outgassing | Hundreds of tiny craters in self-leveling floors, appearing during the pour or within hours. | Vapor escaping from the slab during the coating’s open time bursts through the uncured film. |
Why Is My Epoxy Floor Blistering Months After Installation?
Blistering that appears weeks or months after installation points to moisture, not application error. Use the failure mode to decide what to check first:
- Osmotic blistering: liquid-filled domes that grow over weeks – run an ASTM F2170 RH test first, because dissolved salts and high internal humidity are the usual drivers.
- Delamination: large sheets peeling under traffic – check surface preparation (laitance, dust, or contamination) and the RH reading together; either can be the weak link.
- Efflorescence: white salt deposits bleeding through the film – look for a groundwater source in slabs on grade and test RH before re-coating.
- Pinholing: hundreds of tiny craters appearing during the pour – check the slab’s age and emission rate at installation time; young slabs outgas during the coating’s open time.
The pattern in our records is consistent: when a failed floor reaches us, the moisture reading almost always explains the failure mode.
The data: Industry failure-analysis studies consistently identify moisture as the most common cause of premature resinous coating failure. In our own failure investigations at KAIDA PAINT, a manufacturer of epoxy, polyurethane, and urethane cement flooring systems, the pattern is identical: projects that failed within 24 months almost always showed moisture readings above the manufacturer’s limit at the time of installation.
Field example: My contractor says the slab is dry because it looks dry – is that a reliable check? Usually not, as this case shows. In a beverage warehouse in Southeast Asia, a contractor installed a 3 mm self-leveling epoxy system on a slab that had been poured only six weeks earlier. The slab surface was dry to the touch, and no moisture testing was performed. Within three months, osmotic blisters covered roughly 15% of the floor. When we measured the slab afterward, internal relative humidity was 91%. The failed epoxy floor was removed, the slab dried for another five months, and the replacement system was installed with a documented moisture test result of 71% RH. That floor has now performed without failure for over three years.
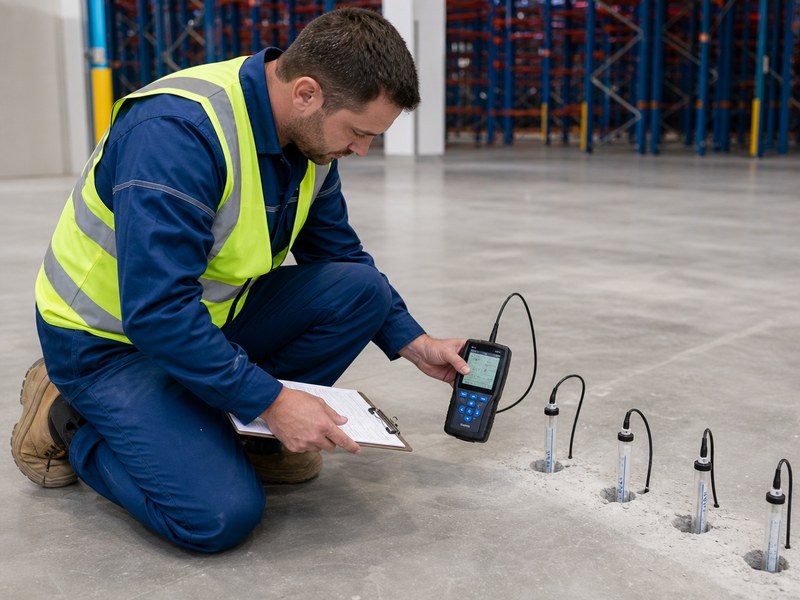
Figure 2. KAIDA PAINT technician recording ASTM F2170 RH readings on site before resinous flooring installation.
2. Why Is a Resin Coating Especially Vulnerable to Moisture?
A resinous floor is vulnerable because it is designed to be impermeable – and impermeability is the opposite of what a drying concrete slab needs. Resilient tiles, carpet, and breathable sealers allow vapor to escape. Epoxy, polyurethane, and MMA (methyl methacrylate) films do not, so they concentrate all the vapor pressure at a single interface.
Bond strength measured by pull-off adhesion per ASTM D4541 is typically 1.5-3.0 MPa for a properly installed epoxy system on prepared concrete. Vapor pressure from a wet slab does not need to match that number to cause failure; it only needs to exceed the local bond at the weakest point, which is usually where laitance (a weak, powdery surface layer), dust, or salt contamination was left behind. Under a hot floor or a heated building, vapor pressure rises further, which is why failures often appear first in summer.
Not all resinous systems are equally sensitive. Standard epoxy is the least moisture-tolerant family. Polyurethane systems accept slightly higher humidity. Urethane cement flooring is the most tolerant: it cures and bonds on damp substrates because the cementitious component consumes water as part of its chemistry, and the system is formulated to handle elevated slab moisture that would destroy a standard epoxy. Our complete guide to urethane cement flooring covers its benefits, uses, cost, and installation in detail.
The practical rule: the more impermeable and the more rigid the system, the lower the acceptable moisture level. Specify the system first, then test against that system’s published limit – not against a generic “dry enough” guess.
3. Where Does the Moisture in Concrete Come From?
Moisture in concrete has five main sources, and you need to identify which ones are active before you can decide whether the slab will ever dry.
- Mix water: a typical slab is placed with 150-200 liters of water per cubic meter of concrete. Only a fraction is consumed by hydration; the rest must evaporate, and in a 150 mm slab that can take months.
- Groundwater and vapor drive: in slabs on grade (poured directly on soil or fill, with no basement or crawl space below) without an effective vapor barrier, groundwater migrates upward continuously. This moisture never fully dries; it must be stopped, not waited out.
- Missing or damaged vapor barrier: a polyethylene vapor barrier that was punctured, overlapped incorrectly, or omitted entirely turns a drying problem into a permanent one.
- Building conditions: high ambient humidity, unventilated spaces, and buildings without HVAC slow drying and can even re-wet a slab. Condensation on a cold slab adds surface moisture overnight.
- Leaks and washing: pipe leaks, roof leaks, and power-washing of the slab surface introduce moisture long after the concrete has cured.
A quick diagnostic: if a slab is on grade or below grade, assume groundwater is a candidate source. If it is suspended on a metal deck, mix water is the dominant source and the slab will dry predictably. In both cases, test – the test tells you which situation you are in.
How to Inspect a Sub-Slab Vapor Barrier: A 5-Point Checklist
A sub-slab vapor barrier is the most reliable defense against groundwater, but only if it survived the pour. Before placing concrete, walk the installation with this checklist:
- Lap direction. The upper sheet must overlap the lower sheet in the direction of the pour, so the concrete flow presses the laps flat instead of peeling them open.
- Punctures and tears. Repair every hole with the manufacturer’s compatible tape or patch; debris trapped under the membrane creates hard spots that tear under traffic or finishing.
- Pipe and column penetrations. Sleeves need sealed boots or clamped tape; this is the most common place barriers fail in practice.
- Wall and foundation connections. The membrane should be turned up the wall or sealed to it with a compatible tape, so moisture cannot travel around the edge of the slab.
- Final walk before the pour. Confirm no visible holes, folds, or open laps remain; once the concrete is placed, you cannot verify continuity again.
If the slab was poured without a sub-slab barrier, or the barrier cannot be verified, the alternative is a surface-applied two-coat moisture barrier before the topcoat – covered in Section 8.
4. How Dry Is Dry? The Moisture Limits That Matter
Resin manufacturers publish maximum moisture limits for their systems. Two measurements are used, and they answer different questions:
- Relative humidity (RH) inside the slab – measured with in-situ probes per ASTM F2170. This is the predictive test: it tells you how much water remains in the concrete and how it will behave long term.
- Moisture vapor emission rate (MVER) – measured at the surface with the calcium chloride test per ASTM F1869, expressed in lbs per 1,000 sq ft per 24 hours. This measures current surface evaporation, which is not always representative of deeper slab moisture.
Typical maximum moisture limits for resinous flooring systems
| Flooring system | Maximum RH (ASTM F2170) | Maximum MVER (ASTM F1869) |
|---|---|---|
| Standard epoxy systems | 75% RH | 3 lbs / 1,000 sq ft / 24 h (about 15 g/m²/24 h) |
| Epoxy with moisture-tolerant primer | Up to 85% RH | Up to 5 lbs / 1,000 sq ft / 24 h (about 24 g/m²/24 h) |
| Polyurethane systems | 80-85% RH | Up to 5 lbs / 1,000 sq ft / 24 h (about 24 g/m²/24 h) |
| Urethane cement systems | No standard limit; accepted on damp slabs | 8 lbs / 1,000 sq ft / 24 h and above (about 39 g/m²/24 h and above) |
| Moisture mitigation systems (barrier + topcoat) | System-dependent; 90%+ RH possible | 10+ lbs / 1,000 sq ft / 24 h (about 49 g/m²/24 h and above) |
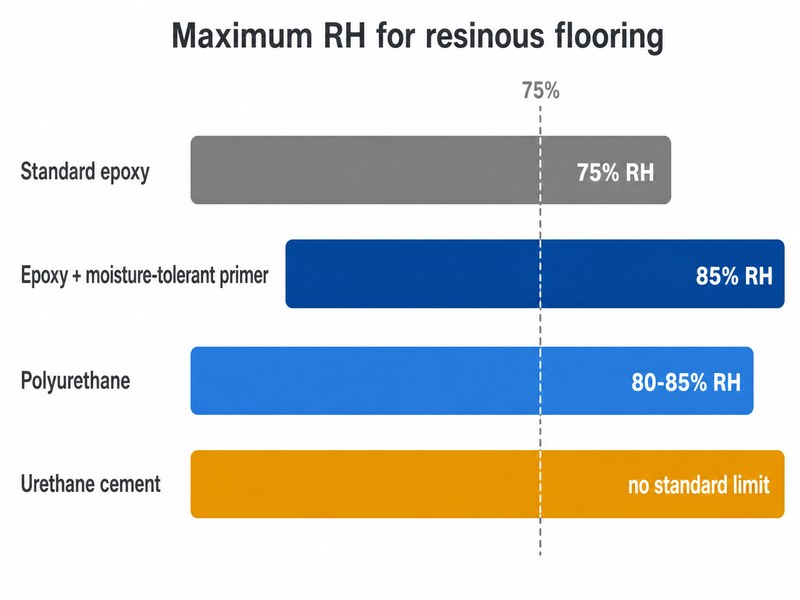
Figure 3. Maximum moisture limits for resinous flooring systems: 75% RH for standard epoxy, up to 85% with a moisture-tolerant primer.
How to interpret in-slab RH readings (ASTM F2170)
| In-slab RH (ASTM F2170) | What it means | Recommended path |
|---|---|---|
| Below 75% | Ready for standard epoxy | Proceed with the standard system; confirm MVER if the specification requires it |
| 75-85% | Above the standard-epoxy limit | Moisture-tolerant primer, or more drying time |
| 85-90% | Above the primer window | Two-coat moisture barrier, or urethane cement flooring |
| Above 90% | Severe moisture; prolonged drying is unlikely to help | Barrier system or urethane cement; investigate the groundwater source first |
Always confirm the limit in the specific product’s technical data sheet (KAIDA PAINT system TDS). The numbers above are the industry-typical ranges we use in specification work at KAIDA PAINT; they are not a substitute for the manufacturer’s published value for the exact system you plan to install. How long a slab needs to reach these limits is covered in Section 5.
5. How Long Does Concrete Take to Dry Before Epoxy?
The rule of thumb used across the flooring industry is roughly one month of drying per inch (25 mm) of slab thickness under normal conditions, measured from the end of curing – so a 4-inch (100 mm) slab typically needs about four months before it reaches 75% RH. Concrete that has cured for only 28 days is almost always too wet for a resinous floor, even though it is fully strong enough to walk on.
Our drying trials: In KAIDA PAINT’s drying trials across 60+ slabs in Asia and Europe, the one-month-per-inch rule held as a planning minimum rather than a guarantee. Slabs poured in cool, humid conditions, or those without a sub-slab vapor barrier, routinely needed 20-30% longer to reach 75% RH.
How long does concrete take to dry before epoxy in a cold, humid climate? Longer than most schedules assume – high ambient humidity slows surface evaporation, so the same slab that dries in four months in a warm, ventilated building can take six or more in a cold, damp one.
Moisture in Tropical and Humid Climates
Moisture behavior in Southeast Asia, the Middle East, and other hot-humid regions differs from temperate sites in three ways that change the testing schedule:
- Seasonal swings: RH readings inside a slab can climb several percentage points between the dry and wet seasons. A slab that passes in March can fail in August, so test during the wettest period you can schedule.
- Re-wetting when cooling stops: when air conditioning is switched off for nights, weekends, or power cuts, warm humid air condenses on the cool slab surface and adds moisture on top of the vapor rising from below.
- Longer drying curves: high ambient humidity slows surface evaporation, so drying times run longer than the temperate-climate rule of thumb. Dehumidification, not ventilation alone, is usually required to move a young slab below the limit.
Our Southeast Asia project records show that slabs which pass during the dry season need re-verification at the start of the wet season before the coating warranty period begins.
Typical drying progression for a 150 mm (6 in) slab under favorable, ventilated conditions
| Time since placement | Typical in-slab RH | Ready for standard epoxy? |
|---|---|---|
| 28 days | Usually 90% or above | Нет |
| 60 days | Usually 85-92% | No; the moisture-tolerant primer window may apply near 85% |
| 90 days | Usually 80-88% | Test; many slabs are still too wet |
| 180 days and beyond | Usually 75% or below | Test to confirm |
These are typical observations from our project records, not guarantees – the ASTM F2170 reading governs readiness.
Why drying is slower than you expect: drying happens from the exposed surface only, and the rate falls as the surface dries because vapor must travel through an increasingly dry crust. Several factors accelerate or delay this:
- Water-cement ratio: a low w/c mix (0.45 or below) dries faster than a high-slump mix.
- Sub-slab vapor barrier: a correctly installed barrier prevents groundwater from re-wetting the slab; without one, the slab may never dry below the limit.
- Ventilation and temperature: warm, dry airflow removes vapor from the surface; cold, humid, or stagnant conditions stall drying.
- Slab thickness: thicker slabs store more water and take proportionally longer to dry.
- Sealed surfaces: curing compounds, hardeners, or an earlier failed coating can seal the surface and trap moisture inside.
Drying time also reads differently depending on who is waiting. For a contractor scheduling a job, drying time is a schedule risk: a November pour means a March coating date at best. For a facility owner, the same wait means downtime and lost rent. For a homeowner doing a garage floor, it usually means adjusting a holiday-weekend plan. Budget the drying period into the schedule from day one in every case.
The mistake we see most often is scheduling the coating before the drying math: a project poured in November, coated in February, and blistered by June. In our failure investigations, that pattern outnumbers every other cause of early failure.
6. How to Test Moisture in Concrete: Four Standard Methods
Which concrete moisture test you choose depends on whether you need a screening check or a documented, spec-compliant result. Use the table to match the method to the situation. As of 2026, major specifications increasingly prefer ASTM F2170 in-situ RH testing over calcium chloride for new slabs, so expect the RH test where the stakes are highest.
What moisture test should I run before coating a warehouse floor that is on grade? Start with the slab’s history: RH probes for a new or thick slab, calcium chloride for a quick surface check on an older one, and a moisture meter to map where to test.
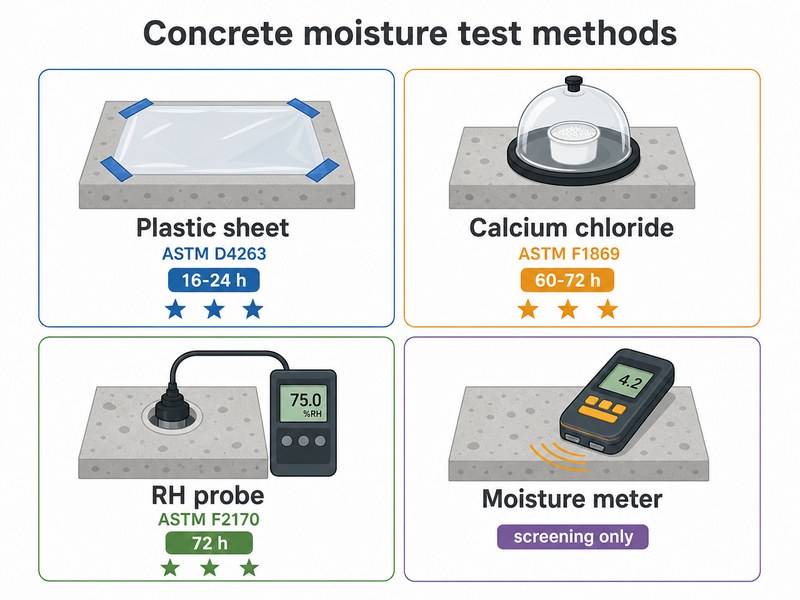
Figure 4. The four concrete moisture test methods compared: plastic sheet, calcium chloride, in-situ RH probe, and moisture meter.
Comparison of concrete moisture test methods for resinous flooring
| Method | Стандарт | What it measures | Time | Лучшее для | Limitation |
|---|---|---|---|---|---|
| Plastic sheet test | ASTM D4263 | Surface moisture / capillary moisture presence | 16-24 часа | Quick qualitative screening | Pass/fail only; no numeric value |
| Calcium chloride (MVER) | ASTM F1869 | Moisture vapor emission rate at the surface | 60-72 hours | Contractor-friendly, standardized, widely specified | Surface-only; can underestimate deep slab moisture on new slabs |
| In-situ RH probe test | ASTM F2170 | Internal relative humidity of the slab | 72 hours minimum | New slabs, thick slabs, spec-critical projects | Requires drilling; more setup than other methods |
| Concrete moisture meter | None (instrument) | Electrical impedance / capacitance reading | Minutes | Rapid scanning to map problem areas | Not ASTM-compliant; use only as a screening tool |
6.1 Plastic Sheet Test (ASTM D4263)
Tape an 18 x 18 inch (450 x 450 mm) polyethylene sheet to the concrete with all edges sealed, and leave it for 16-24 hours. Remove the sheet and check the concrete beneath for darkening or condensation. Any visible moisture means the slab is too wet to coat and requires further investigation.
The plastic sheet test is the cheapest possible screening check, but it only detects active surface moisture. A slab can pass the plastic sheet test and still be at 90% internal RH. Use the plastic sheet test only as a pre-check; confirm readiness with an ASTM F2170 RH test or an ASTM F1869 calcium chloride test before coating.
6.2 Calcium Chloride Test (ASTM F1869)
A pre-weighed dish of anhydrous calcium chloride is placed on the slab and sealed under a dome for 60-72 hours. The dish is then re-weighed, and the weight gain is converted into a moisture vapor emission rate in lbs per 1,000 sq ft per 24 hours.
The pass/fail line for most standard epoxy systems is 3 lbs per 1,000 sq ft per 24 hours. Readings above that require a moisture barrier, a moisture-tolerant system, or more drying time. The method is fast, inexpensive, and widely accepted in specifications, which is why it remains the most common moisture test before epoxy flooring installation on commercial projects. It measures only what the surface is emitting today, however – a freshly poured slab can emit little vapor early and much more later as moisture migrates upward, so it can understate the risk on young slabs.
6.3 In-Situ RH Probe Test (ASTM F2170)
The RH probe test is the industry’s most predictive concrete moisture test. Sensors are inserted into holes drilled to a defined depth in the slab, and the internal relative humidity is read after the assembly equilibrates. Because it measures the moisture actually stored in the concrete rather than surface evaporation, it catches the failure mechanism before it happens. Section 7 gives the full step-by-step procedure.
Reading rule: compare the highest reading at any probe location against the manufacturer’s limit, not the average – a single hot spot can fail a slab even when the mean looks acceptable. Record the temperature with each RH reading, because humidity readings shift with slab temperature.
6.4 Concrete Moisture Meter (Screening Only)
Handheld moisture meters for concrete give instant readings across large floor areas, which makes them excellent for mapping wet zones before installing probes. Use the moisture meter only for rapid screening and mapping; document compliance with an ASTM F2170 RH test or an ASTM F1869 calcium chloride test. Meter readings are affected by surface salts and aggregate type, so they cannot stand alone on a specification-driven project.
6.5 Should You Run Both Tests? The Dual-Test Protocol
This is the question we hear most often from specifiers: why not run the RH test and the calcium chloride test together? On spec-critical projects – on-grade slabs, young slabs, or floors where failure would stop production – we run both. The RH test decides; the calcium chloride test documents.
- Run both when: the slab is new (under six months), the building is on grade, or the specification calls for documentation of vapor emission.
- When the results conflict, trust the RH probe. RH measures the water stored inside the concrete, which drives long-term failure; calcium chloride measures only today’s surface evaporation, which can read low on a young slab.
- The added cost is small: roughly one extra kit and half a day of labor on a typical project – a fraction of the re-test cost if a single test was wrong.
7. ASTM F2170 RH Testing, Step by Step
The in-situ RH test is the standard we recommend for new slabs and for any project where a failure would be expensive. Here is the procedure we follow on every KAIDA PAINT installation.
Plan the test at least one week before the coating date: 48 hours of building conditioning plus a minimum of 72 hours of probe equilibration means the earliest reliable reading comes about five days after you start.
- Condition the building. Run the HVAC or ventilate the space for at least 48 hours before testing and throughout the test, so the slab reflects service conditions rather than construction conditions.
- Mark test locations. Per ASTM F2170, use a minimum of three probes for the first 1,000 sq ft of slab and one additional probe per 1,000 sq ft after that. Place probes away from walls, joints, and areas that were recently wet.
- Drill to the correct depth. Drill to 40% of the slab thickness when the slab dries from one face only, or 20% of the thickness when it dries from both faces. For a 150 mm slab drying from the top only, that is a 60 mm deep hole.
- Clean and insert the sleeve. Vacuum the hole, insert a clean plastic sleeve to the full depth, and cap it. The sleeve prevents surface air from contaminating the measurement.
- Allow equilibration. Leave the assembly in place for a minimum of 24 hours so the air inside the sleeve reaches equilibrium with the concrete; readings stabilize fully within 72 hours.
- Read and record. Insert a calibrated hygrometer probe, record the RH and temperature at each location, and compare every reading with the resin manufacturer’s limit – typically 75% RH for standard epoxy systems.
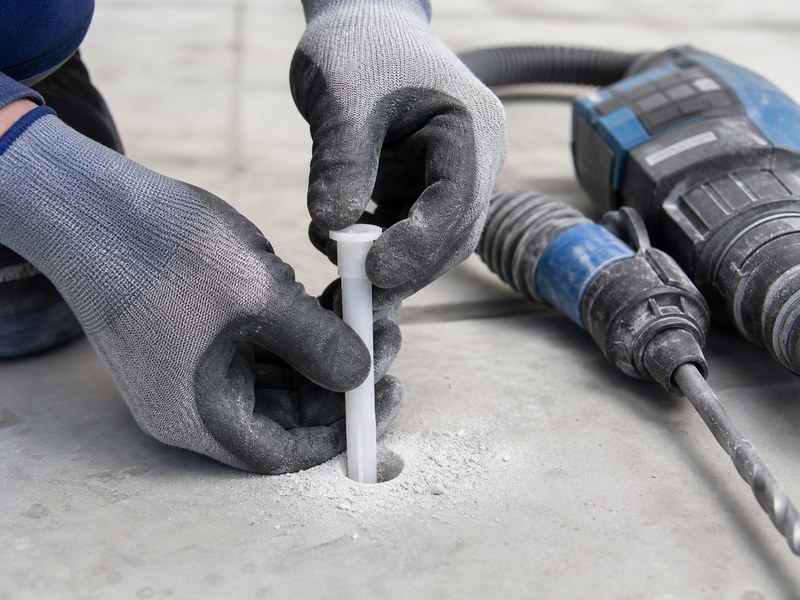
Figure 5. ASTM F2170 in-situ RH testing: probes are drilled to 40% of the slab depth, sealed, and read after equilibrium, giving the most predictive measure of slab moisture before resinous flooring is installed.
The data: the 75% RH threshold for standard epoxy systems is embedded in the specifications of major resin manufacturers. In KAIDA PAINT’s project records, 240+ floors installed with documented RH results at or below 75% over 2015-2025 had a failure rate of under 1% within five years; floors installed above 85% RH failed in roughly one in three projects. As a rule, treat 85% RH as the ceiling for primer-based systems; above it, change the system, not the primer. The coating chemistry is rarely the variable that matters; the slab condition is.
For the system itself, our self-leveling epoxy systems are specified for slabs verified at or below the manufacturer’s limit.
8. What If Moisture Levels Are Too High? Mitigation Options
I have a moisture reading of 88% RH in my slab – what are my flooring options? A failed test is not the end of the project; it is the beginning of the correct specification. You have five realistic paths, and the right one depends on the source of the moisture and the schedule.
Moisture mitigation options for resinous flooring on wet slabs
| Вариант | How it works | Best when | Cost signal |
|---|---|---|---|
| Wait and re-test | Allow continued drying; re-test after 30-60 days | Young slabs with excess mix water and no groundwater source | Lowest cost, but schedule delay |
| Ventilate and dehumidify | Accelerate drying with airflow, heat, and dehumidifiers | Enclosed buildings with controllable climate | Low cost; can halve drying time |
| Moisture-tolerant primer | Specialized primer that cures and bonds at up to 85% RH | Slabs in the 75-85% RH range with standard epoxy topcoats | Moderate; small premium over standard primer |
| Moisture barrier / mitigation system | Two-coat epoxy-based barrier applied to the slab surface that blocks vapor transmission before the topcoat | High MVER slabs, on-grade slabs without an effective sub-slab vapor barrier | Higher; typically adds one working day and a measurable material cost |
| Urethane cement flooring | Moisture-tolerant chemistry that bonds and performs on damp slabs | Persistent moisture, food and beverage plants, thermal shock areas | Higher material cost, but no drying delay and proven wet-slab performance |
Two installation realities matter more than the product spec. First, a surface-applied moisture barrier (the two-coat epoxy barrier applied to the slab before the topcoat) is only as good as its continuity: one missed lap at a wall or pipe penetration can re-create the exact failure the barrier was installed to prevent. Second, moisture-tolerant primers widen the acceptable window (typically up to 85% RH) but do not eliminate the limit – they are designed for slabs in the 75-85% RH window. Above 85% RH, specify a two-coat moisture barrier system or urethane cement flooring instead. When readings are extreme (above 90% RH), the honest answer is usually a barrier system or urethane cement, not a standard epoxy with a tolerant primer. For persistent moisture, the full comparison of benefits, uses, cost, and installation is covered in our urethane cement flooring guide.
Not sure which mitigation path fits your readings? Send your RH or calcium chloride results to our specification engineers for a free system recommendation – we respond within 24 hours. Contact KAIDA PAINT
9. Moisture in Concrete FAQ
Quick answers to the most common questions:
How do I know if moisture in concrete is too high for epoxy?
Run an ASTM F2170 RH test or an ASTM F1869 calcium chloride test. Standard epoxy systems require 75% RH or less, or a moisture vapor emission rate of 3 lbs per 1,000 sq ft per 24 hours or less (about 15 g/m²/24 h). Any reading above the manufacturer’s limit means the slab is not ready.
How long does concrete take to dry before epoxy?
Plan on roughly one month per inch (25 mm) of slab thickness after curing, so a 4-inch (100 mm) slab typically needs three to four months. The only reliable confirmation is a test: RH readings below 75% indicate the slab is ready for standard epoxy.
Can you put epoxy on damp concrete?
Standard epoxy is not suitable for damp concrete. Use a moisture-tolerant primer (up to 85% RH), a full moisture barrier system, or urethane cement flooring – a damp slab pushes vapor pressure under a standard film and causes blistering and delamination, and urethane cement is formulated specifically for damp substrates.
What is the difference between a calcium chloride test and an RH probe test, and which one should I use?
The calcium chloride test measures moisture vapor emission at the slab surface over 60-72 hours; the RH probe test measures the internal relative humidity of the concrete itself. Use the RH test when the slab is new or thick, because it sees the water stored deeper in the concrete, which is what drives long-term failure; use calcium chloride when the specification requires a documented emission rate.
How many moisture tests do I need?
Per ASTM F2170, a minimum of three RH probes for the first 1,000 sq ft of slab, plus one probe per additional 1,000 sq ft. The calcium chloride method is commonly specified at three tests per 1,000 sq ft as well.
Does a vapor barrier under the slab mean the concrete will stay dry enough for epoxy?
No – sub-slab vapor barriers are frequently damaged, lapped incorrectly, or bridged at pipe penetrations, and they block groundwater, not the mix water already inside the slab. Always test the slab itself; the test result, not the construction drawings, is what determines readiness.
What is an acceptable moisture level for epoxy on concrete?
For standard epoxy systems, the slab must measure 75% RH or less by ASTM F2170, or emit 3 lbs or less of moisture vapor per 1,000 sq ft per 24 hours by ASTM F1869. Moisture-tolerant primers extend the window to 85% RH; above that, change the system, not the primer.
How much does a concrete moisture test cost?
Expect roughly $50-300 per test kit plus installation labor – under $500 for a typical small project. Against that, a failed resinous floor costs tens of thousands of dollars in removal, substrate repair, reinstallation, and downtime.
Can I epoxy over a slab that already shows white efflorescence?
Not directly. First remove the salts, identify and stop the moisture source, test with ASTM F2170, and only then coat – otherwise the efflorescence returns under the film.
I just poured a new concrete slab – how long should I wait before installing an epoxy floor?
The wait starts from the end of curing, not from the pour date: roughly one month per inch (25 mm) of slab thickness. For a 4-inch (100 mm) slab, plan on three to four months of drying before standard epoxy can even be considered – and the ASTM F2170 reading, not the calendar, is the final word. Section 5 shows the typical in-slab RH progression by slab age.
I’m a contractor – how do I document moisture test results to protect myself from warranty claims?
Keep the raw RH readings and temperatures for every probe location, photograph the drilled sleeves before and after reading, note the date and time, and file them against the manufacturer’s published limit for the system installed. A documented test is the difference between a defensible warranty claim and a dispute.
10. The Bottom Line: Test Before You Resin
Whatever the source – mix water, groundwater, or building conditions – moisture in concrete must be measured before any epoxy floor or other resinous system is installed.
The Cost of Testing vs. the Cost of a Failed Floor
How much does it cost to fix moisture problems in a concrete slab before flooring? Far less than the floor failure it prevents. Testing is the cheapest insurance in flooring: concrete slab moisture test kits are sold by flooring suppliers and instrument manufacturers, and the all-in cost of testing a typical small project is a rounding error against a failed floor:
Cost of moisture testing versus the cost of a failed resinous floor
| Артикул | Typical cost | Примечания |
|---|---|---|
| ASTM F2170 RH test kit | $50-300 per kit | Probes, sleeves, and hygrometer for a typical small project |
| ASTM F1869 calcium chloride kit | $30-80 per test | Multiple tests are usually specified |
| Installation labor | 0.5-1 day | Drilling, sealing, and reading on site |
| Typical small project, fully tested | Under $500 all-in | Kits plus labor |
| Failed resinous floor, typical repair | Tens of thousands of dollars | Removal, substrate repair, reinstallation, downtime |
Estimates vary by region and project size; treat these as order-of-magnitude signals, not quotations.
The Three-Step Path to a Coat-Ready Slab
- Test the slab with the method that fits its age – RH probes for new or thick slabs, calcium chloride for surface checks, and a moisture meter to map where to test.
- Compare every reading with the manufacturer’s published limit for your exact system, not a generic threshold.
- Choose the mitigation path that matches the measured condition – more drying time, ventilation and dehumidification, a moisture-tolerant primer, a barrier system, or a different flooring family such as urethane cement.
Get a Free Moisture Testing Consultation.
Send us your floor area, slab age and thickness, moisture readings if you have them, traffic, and chemical exposure – our specification engineers will respond within 24 hours with a recommended system (standard epoxy, moisture-tolerant epoxy primer, vapor barriers, or urethane cement), a moisture mitigation path if needed, a coverage estimate, and indicative pricing.
Contractors: send your readings for a system recommendation. Facility owners: ask for the moisture testing checklist and a budget estimate.




 English
 Spanish
 Portuguese
 Arabic
 French
 Italian
 Russian
 Indonesian
 Swedish